Introduction
This is Part 3 in a new series of guides about getting started with Windows 365. This series of guides will help you to learn all about Windows 365 in a clear and insightful way. This series is co-written by Niall & Paul, both of whom are Enterprise Mobility MVP’s with broad experience in the area of modern management. At the time of writing, Paul is a 6 times Enterprise Mobility MVP based in the UK and Niall is a 12 times Enterprise Mobility MVP based in Sweden. In this series we aim to cover everything we learn about Windows 365 and share it with you to help you to deploy it safely and securely within your own organization. In Part 1 we introduced you to Windows 365, selecting the right edition with the level of management that you need, choosing the plan that suits your users needs at a cost you can afford, or modifying the configuration to make it more suited to your individual needs, purchasing licenses and saving money for your organization via the Windows Hybrid Benefit. In Part 2 you learned how to provision an Azure Ad joined Cloud PC and take a look at the different network options available when provisioning an Azure Ad joined Cloud PC. In this part we’ll learn about the steps needed to successfully provision a Hybrid Azure Ad Joined Cloud PC. Please allow yourself plenty of time to complete this part as there is a lot to do.
Below you can find all parts in this series:
- Getting started with Windows 365 – Part 1. Introduction
- Getting started with Windows 365 – Part 2. Provisioning an Azure Ad Joined Cloud PC
- Getting started with Windows 365 – Part 3. Provisioning a Hybrid Azure Ad Joined Cloud PC <- you are here
- Getting started with Windows 365 – Part 4. Connecting to your Cloud PC
- Getting started with Windows 365 – Part 5. Managing your Cloud PC
- Getting started with Windows 365 – Part 6. Point in time restore
- Getting started with Windows 365 – Part 7. Patching your Cloud PCs with Windows Autopatch
- Getting started with Windows 365 – Part 8. Windows 365 boot
- Getting started with Windows 365 – Part 9. Windows 365 switch
- Getting started with Windows 365 – Part 10. Windows 365 offline
In this part we’ll cover the following:
- Create an Azure Resource Group
- Create a Virtual Network
- Configure DNS
- Create a Virtual Network Gateway
- Take note of the Public IP address
- Create a Local Network Gateway
- Add connection between the local and virtual network gateway
- Setup static routes
- Install Routing and Remote Access
- Configure Routing and Remote Access
- Configure demand-dial interface
- Create static route
- Configure persistent connection
- Configure preshared key
- Verify connection
- Create Azure network connection
- Provision a Hybrid Azure Ad joined Cloud PC
Create an Azure Resource Group
Windows 365 uses Resource Groups in Azure to store certain resources, such as Virtual networking, a Virtual Network Gateway or an Azure network connection (ANC). You could use the previously created Resource Group we created in part 2, or keep things orderly and create a brand new one for this part. Let’s go ahead and create a new Resource Group in Azure.
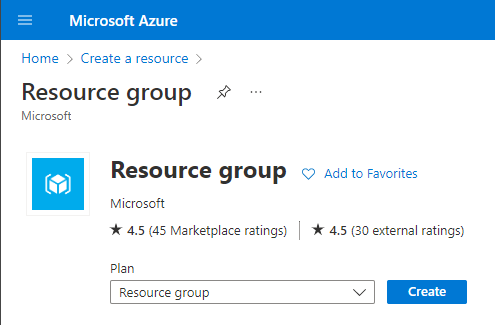
Login to https://portal.azure.com and click on Create a resource, select Resource Groups,
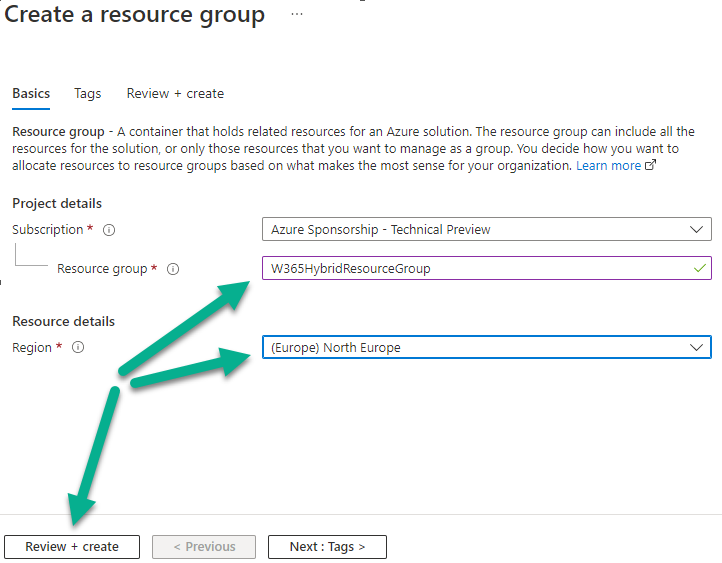
Select Create and create a new resource group in an Azure region close to you. Give the resource group a suitable name like W365HybridResourceGroup
Click Review + create to complete the wizard.
Create a Virtual Network
Windows 365 hybrid azure ad joined Cloud PC’s need working DNS to access both the on-premises environment and Internet resources too. After the creation of this virtual network, we’ll specify Custom DNS settings to resolve those DNS requirements.
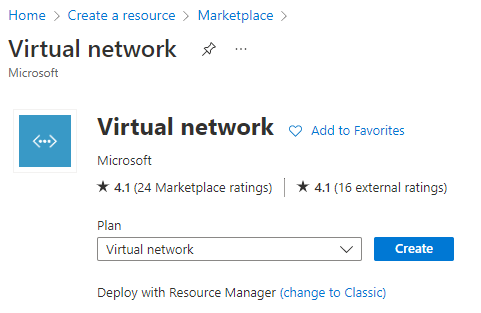
Login to https://portal.azure.com and click on Create a resource, select Virtual Network,
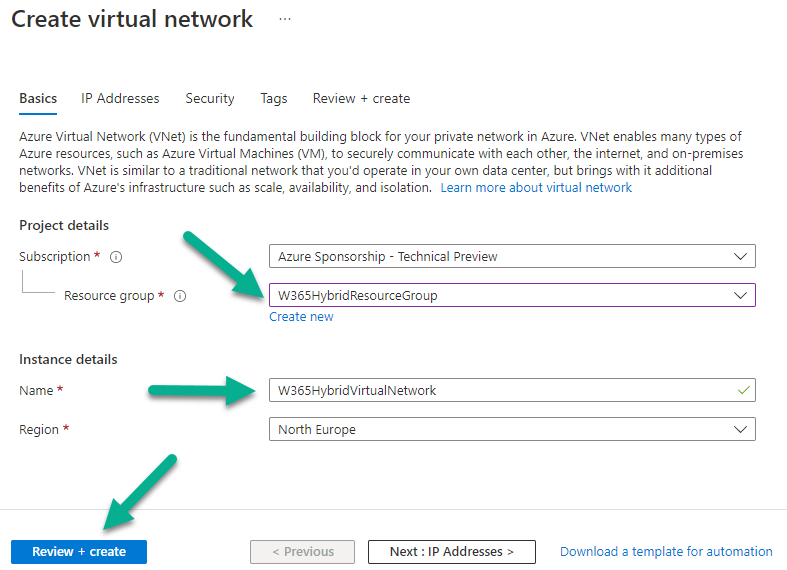
When the wizard appears, select the previously created W365HybridResourceGroup, select the nearest region, give the virtual network a suitable name such as W365HybridVirtualNetwork and click on Review + Create
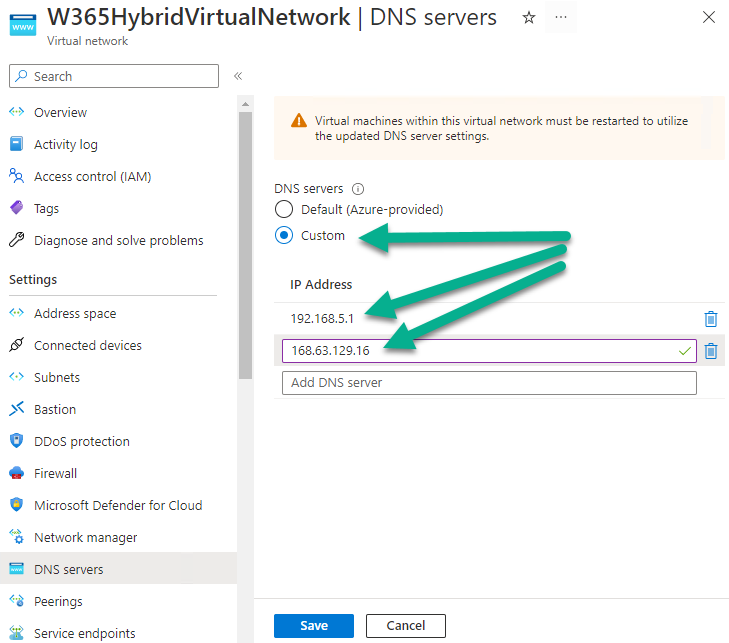
Once created, select the virtual network, and expand the DNS servers node. Click on Custom and add one or more DNS address of your on-premises DNS server, you should probably also (as a best practice) add 168.63.129.16 which is Azure status DNS as described here = What is IP address 168.63.129.16? | Microsoft Learn.
Once you have added your Custom DNS settings, click Save.
Create a Virtual Network Gateway
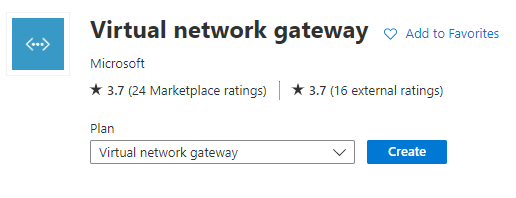
In portal.azure.com click on Create a resource, select Virtual Network Gateway and then click on Create.
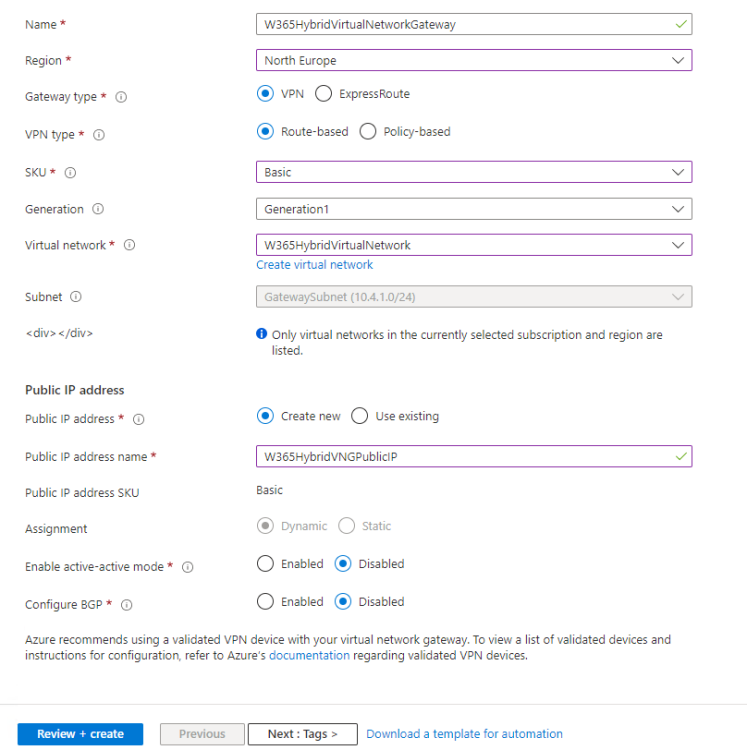
Next, proceed to fill in the following settings, be careful how you enter them as it’s not fun trying to delete them afterwards. Also keep in mind that it takes time to create a Virtual Network Gateway:
- Subscription: <Your Subscription>
- Resource Group: W365HybridResourceGroup
- Name: W365HybridVirtualNetworkGateway
- Region: <Your region>
- Gateway type: VPN
- VPN type: Route-Based
- SKU: Basic
- Generation: Generation 1
- Virtual Network: W365HybridVirtualNetwork
- Gateway subnet address range: 10.4.1.0/24
- Public IP address: Create new
- Public IP address name: W365HybridVNGPublicIP
- Public IP address SKU: Basic
- Enable active-active mode: Disabled
- Configure BGP: Disabled
Finally, click on Review + Create and then click on Create to complete the process.
Note: You can click the following link if you’d like to learn more about Azure VPN Gateway settings – About Azure VPN Gateway | Microsoft Learn
Take note of the Public IP
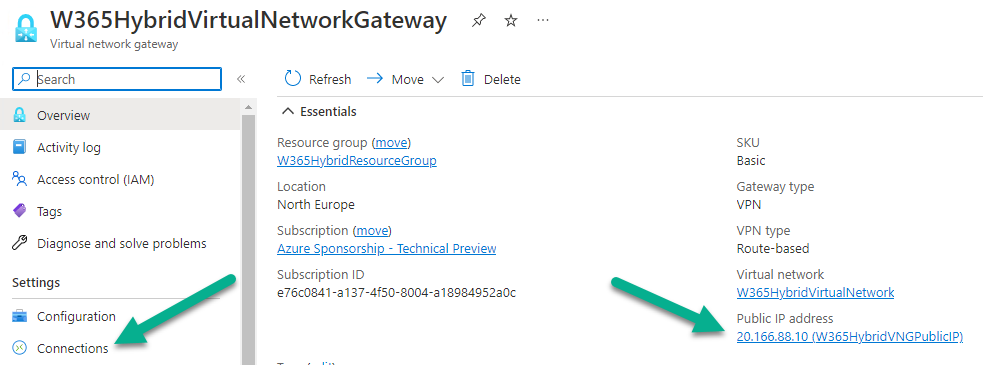
Next, take note of the Virtual Network Gateway connections Public IP address, you’ll need it for later.
Create a Local Network Gateway
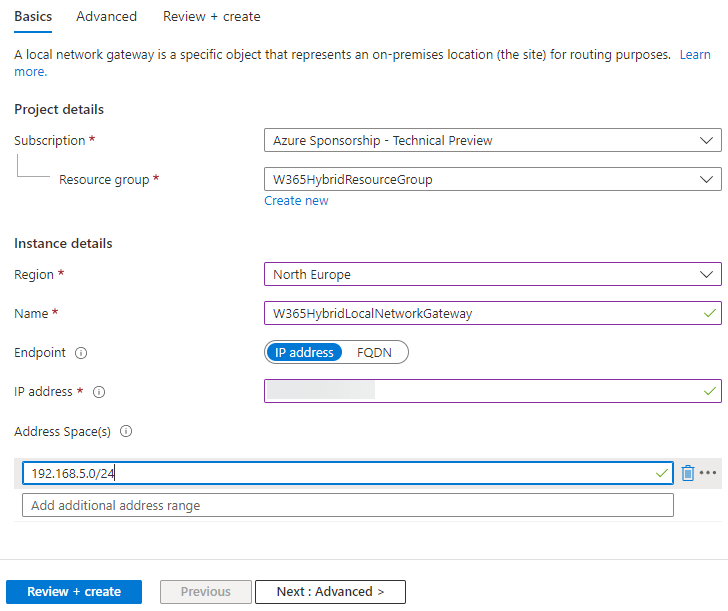
We also need a Local Network Gateway to bridge the gap between cloud and on-premises, and for that to succeed we need a publicly accessible IP address on your on-premises network. In portal.azure.com click on Create a resource, select Local Network Gateway and then click on Create. Note that if your public IP changes over time, you can look at configuring with a FDQN and use a dynamic DNS provider to handle the change in address.
Fill in the following values
- Subscription: <Your Subscription>
- Resource Group: W365HybridResourceGroup
- Region: <Your region>
- Name: W365HybridLocalNetworkGateway
- Endpoint: IP address
- IP address: <publicly available IP address on your on-premises network>
- Address space: IP range of your on-premises IP
Finally, click on Review + Create to complete the process.
Add connection between the local and virtual network gateway
Now that you have configured two network gateways (virtual+local) it’s time to create a connection between them. To do that, select the W365HybridLocalNetworkGateway and click on Connections.
Click +Add and fill in the following details.
- Name: W365AzureVPNconnection
- Connection type: Site-to-site (IPsec)
- Virtual network gateway: W365HybridVirtualNetworkGateway
- Local network gateway: W365HybridLocalNetworkGateway
- Shared key (PSK): <some unique key>
- IKE protocol: IKEv2
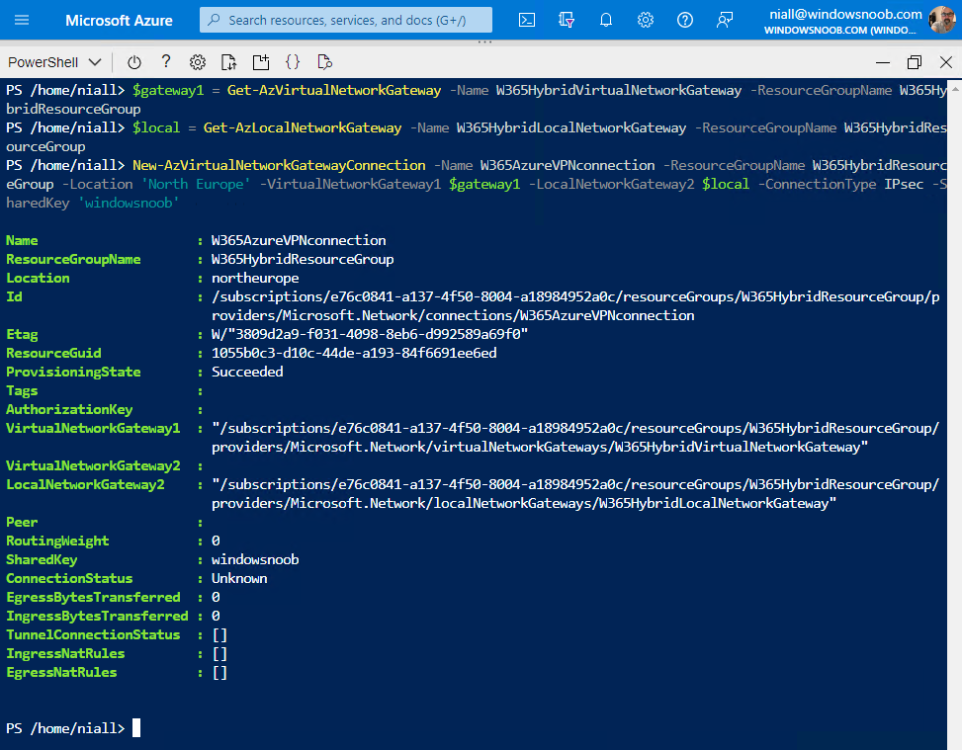
Note: if the Azure portal doesn’t allow you to set either the Virtual network gateway or the Local network gateway for this (and it didn’t for us), then use the CloudShell with the following PowerShell script.
$gateway1 = Get-AzVirtualNetworkGateway -Name W365HybridVirtualNetworkGateway -ResourceGroupName W365HybridResourceGroup
$local = Get-AzLocalNetworkGateway -Name W365HybridLocalNetworkGateway -ResourceGroupName W365HybridResourceGroup
New-AzVirtualNetworkGatewayConnection -Name W365AzureVPNconnection -ResourceGroupName W365HybridResourceGroup -Location 'North Europe' -VirtualNetworkGateway1 $gateway1 -LocalNetworkGateway2 $local -ConnectionType IPsec -SharedKey 'windowsnoob'
To use the Cloud shell go to https://portal.azure.com/#cloudshell/
Note: Make sure to modify the values contained within this script to match your chosen values, and paste in each of the 3 lines one at a time.
Once completed without errors, you can review the created local network gateway in Azure.
Setup static routes
Normally this would be handled by your network team and configured on the network switches. To get this working in a lab you can manually add static routes on each server that you want to access resources from. Below is an example of that on the server hosting the DNS role.
route -p add 10.4.0.0 MASK 255.255.255.0 192.168.5.21
Obviously you will need to modify the IP addresses and network mask to suit your setup, in the above example, 10.4.0.0/255.255.255.0 is the ip range in Azure hosting our Cloud PC’s and 192.168.5.21 is the IP address of our on-premises Routing and Remote Access (RRAS) server.
Note: For the purposes of this guide we are providing this info to get you up and running in a lab. In production adding these routes to each on-premises resource is not scalable, and should instead be configured at the network SWITCH or FIREWALL level in your organization.
Install Routing and Remote Access
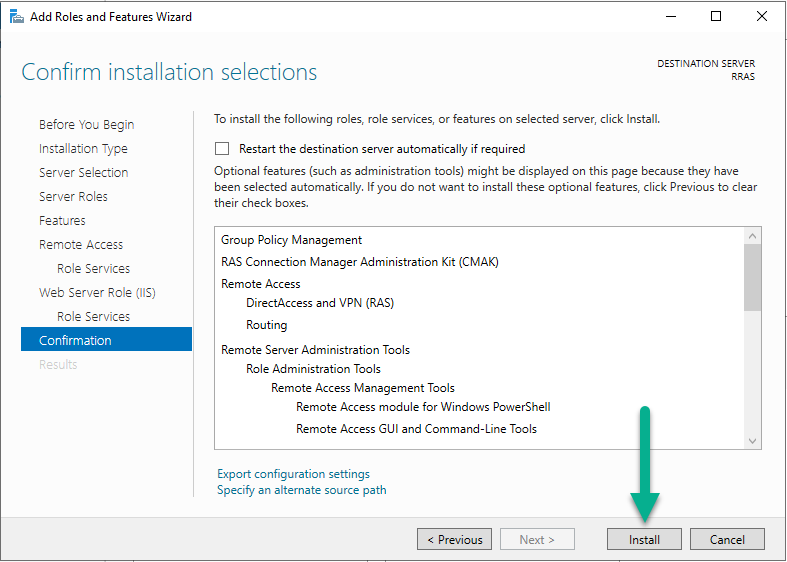
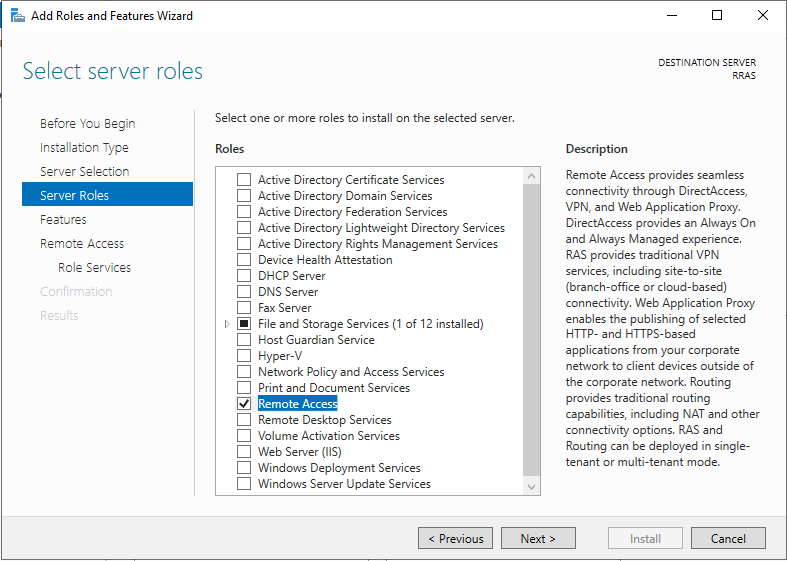
Next, you will install Routing and Remote Access (RRAS) on a workgroup joined server. This is needed to setup a VPN between your on-premises network and the cloud hosting your Cloud PC’s. On a server that you’ll use for this role, select Add roles and features, click next, next, next, and in the Select server roles screen select the Remote Access role and click Next
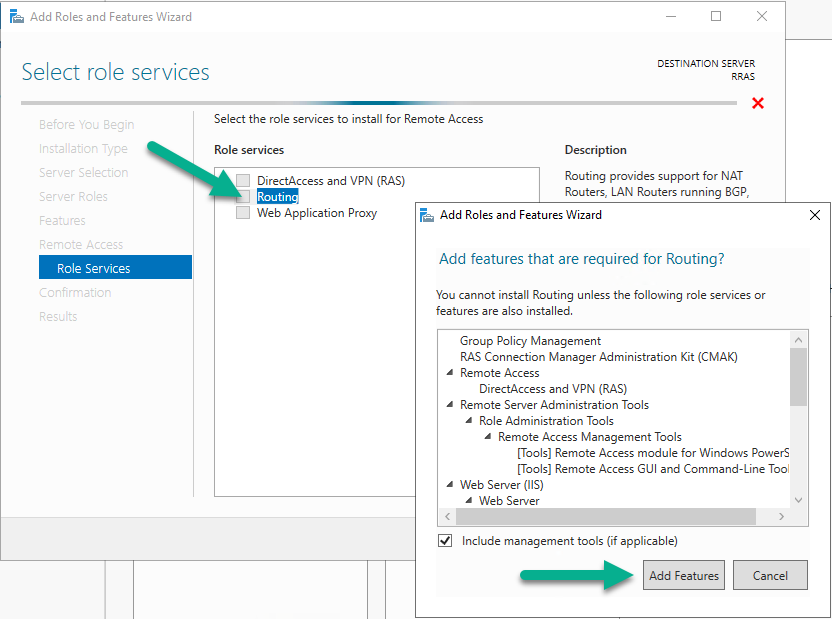
Click Next at the Features screen, then in the Remote Access screen, in the Role Services screen select Routing which will in turn prompt you to add features that are required for Routing, make sure to select Add Features.
Click Next and you’ll see that both DirectAccess and VPN (RAS) are now selected, click Next to continue.
Click Next at Web Server Role (IIS) and Next again at the Role Services screen. Proceed to Confirmation and then click Install.
After the installation is complete, click Close.
Configuring RRAS
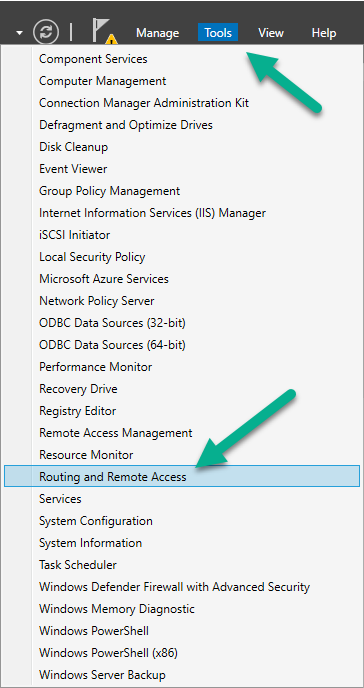
On the server hosting the Remote Access role, click on Tools and select Routing and Remote Access.
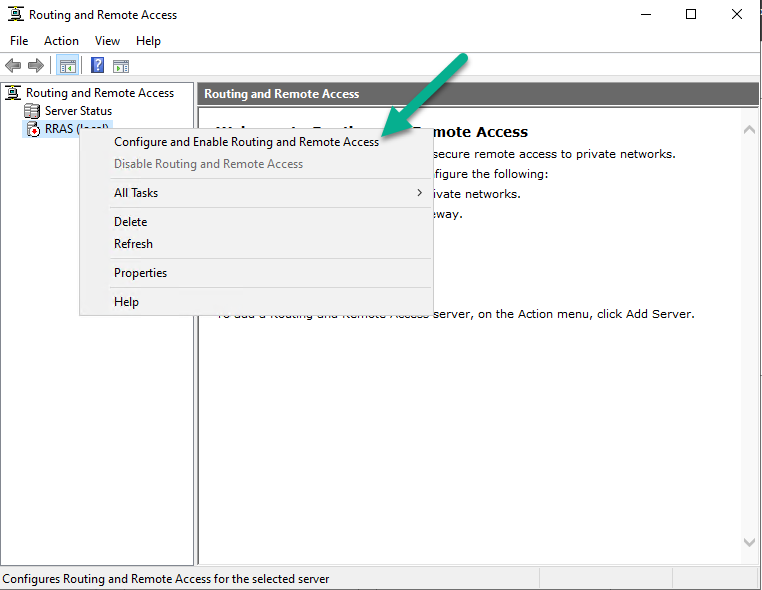
Right click your RRAS server, select Configure and Enable Routing and Remote Access.
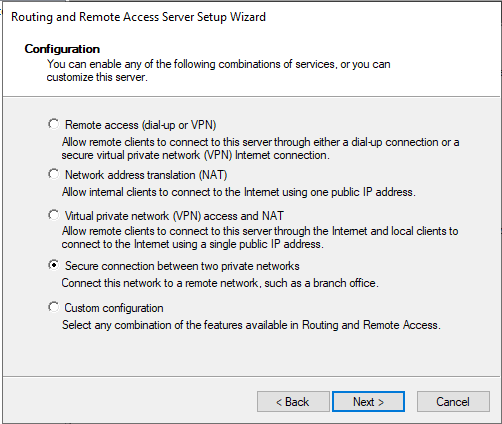
Click Next at the introduction and select Secure connection between two private networks.
Select the following values:
- Demand-dial connections: Yes
- IP Address Assignment: Automatically
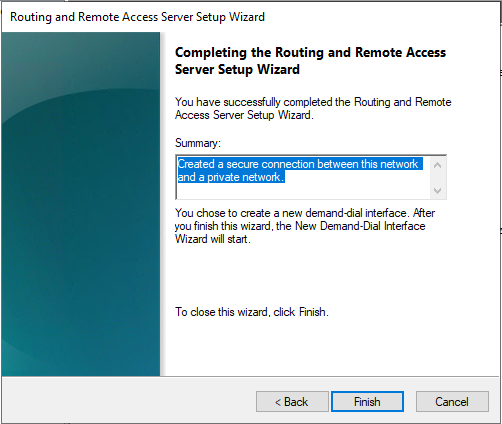
and then click Finish to close the wizard.
Configure demand-dial Interface
After clicking Finish above, it will start RRAS associated services and then launch the Demand-dial wizard.
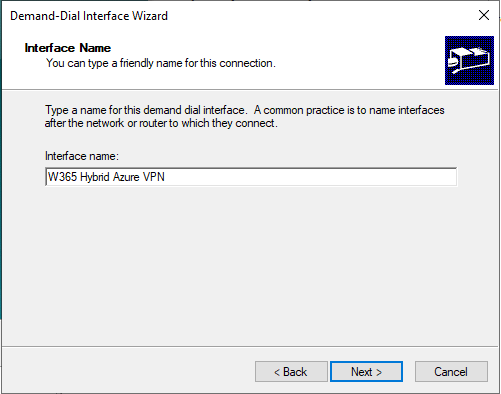
Give the demand-dial Interface name a useful name like W365 Hybrid Azure VPN
Select the following options for the next screens:
- Connection Type: Connect using virtual private networking (VPN)
- VPN Type: IKEv2
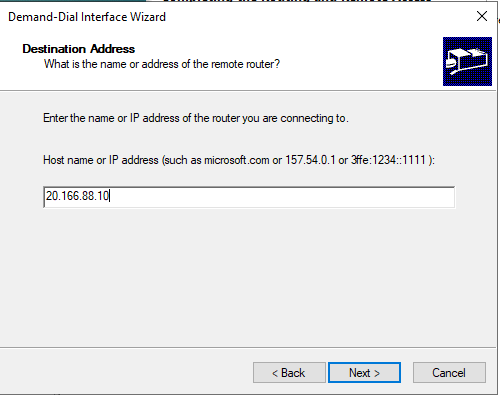
and then enter the Public IP address of the Azure Virtual Network Gateway (W365HybridVirtualNetworkGateway) that you captured earlier on.
Click Next and enter the following:
- Protocols and Security: Route IP packets on this interface
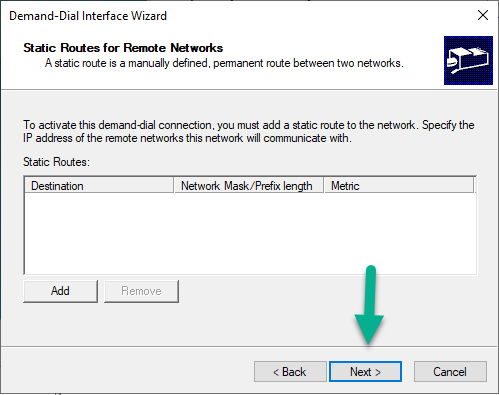
Next you will be prompted to enter Static Routes for Remote Networks, don’t bother as you cannot select the W365 Hybrid Azure VPN you just created (a bug in the UI). You will fill this in later. Just click Next.
There is no need to enter any data for the Dial-Out Credentials screen so click Next and then click Finish to complete the Demand-dial wizard.
Create Static Route
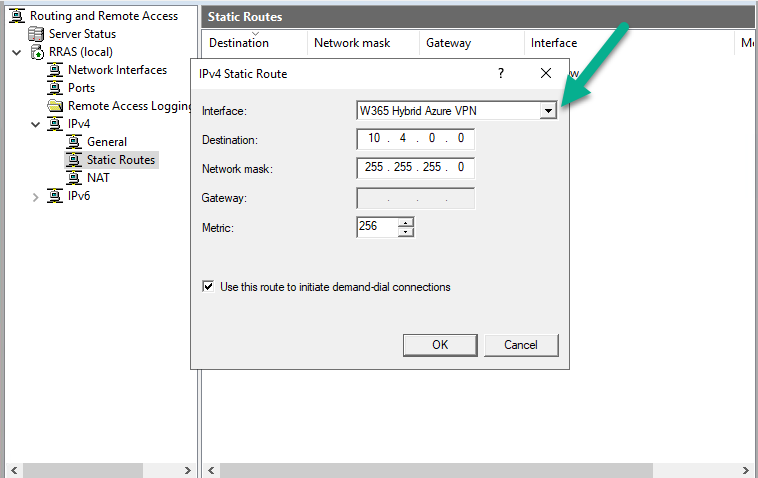
Next, expand the IPv4 node, and select Static Routes. Right click and choose New Static Route. From the drop down menu, select your W365 Hybrid Azure VPN and enter the IP address details of that connection.
Configure persistent connection
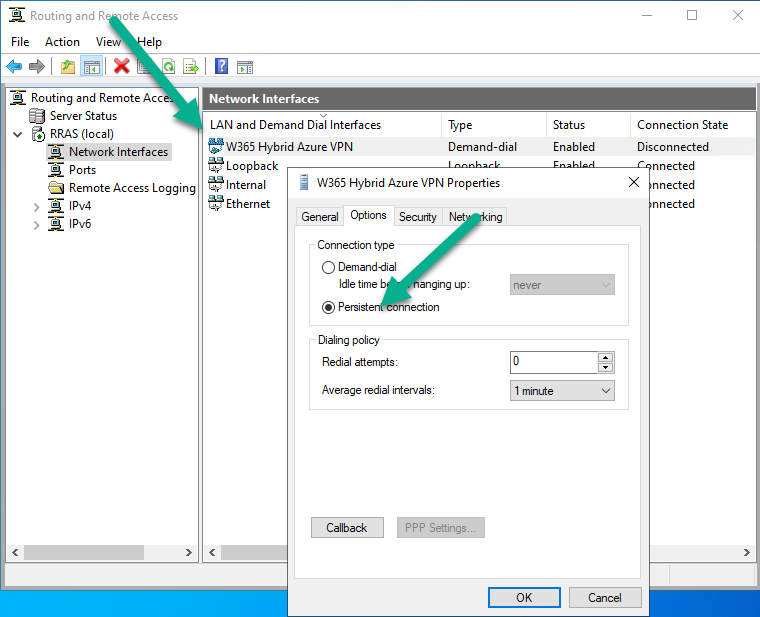
Next, select the W365 Hybrid Azure VPN connection and bring up its properties, set the connection to Persistent connection as below.
Configure preshared key
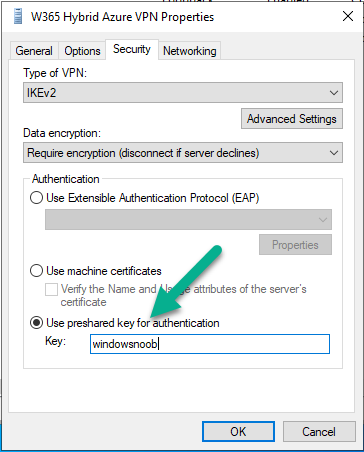
On the security tab, select Use preshare key for authentication and enter the key used when we created the W365AzureVPNconnection
Close the W365 Hybrid Azure VPN properties.
Verify connection
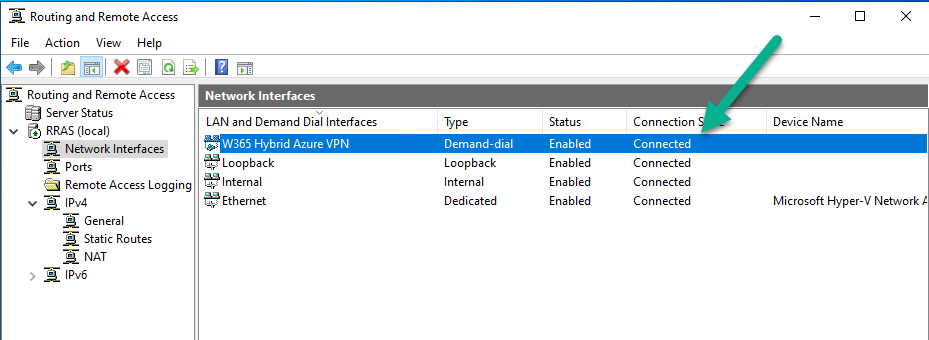
Next, select the Network Interfaces node, select your W365 Hybrid Azure VPN and verify the Connection Status. If it says connected, congratulations, if not, you need to verify your IP address settings used earlier.
You can also review this connection state in Azure by checking the status of the connection for your W365HybridAzureNetworkGateway.
Create Azure network connection
Windows 365 in a Hybrid Azure AD Join scenario uses an Azure network connection to allow your Cloud PC’s to access your on-premises network resources. To create your own Azure Network connection, open the Microsoft Endpoint Manager console, select the Windows 365 node, and then select Azure network connection. Keep in mind that each tenant has a limit of 10 Azure network connections, if you need more than that you must contact Microsoft support.
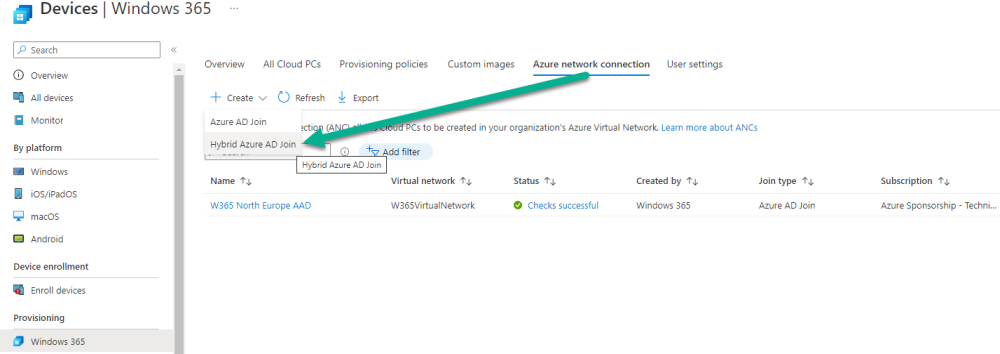
Next, click on + Create and select Hybrid Azure AD Join from the two available options.
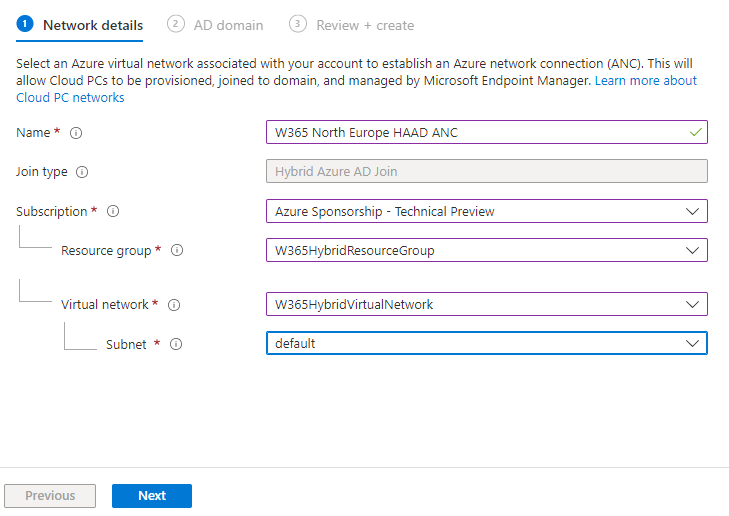
Next give the Azure network connection (ANC) a suitable name, before selecting the Resource Group (that you created previously) and the Virtual Network (which you also created earlier).
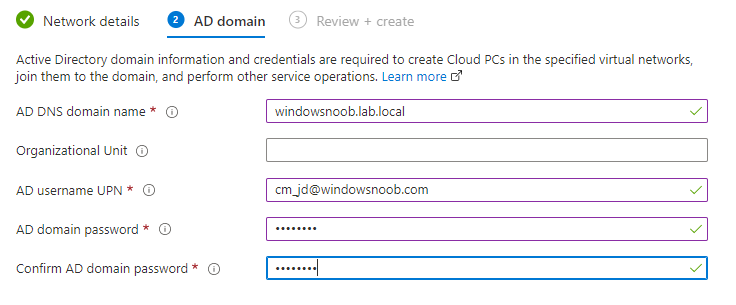
Next enter your on-premises connection info as appropriate.
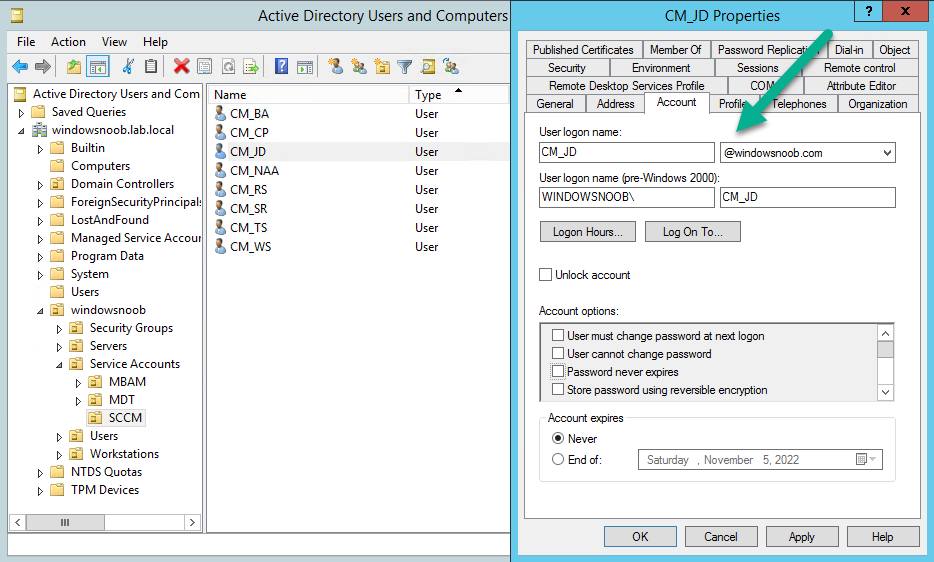
The UPN account specified needs to have permission to allow a Cloud PC to join the on-premises Active Directory Domain.
After creating the W365 North Europe HAAD ANC, it will show a status of Running checks and this can take some time to complete.
and after some time, if all went well the status will change to Checks successful
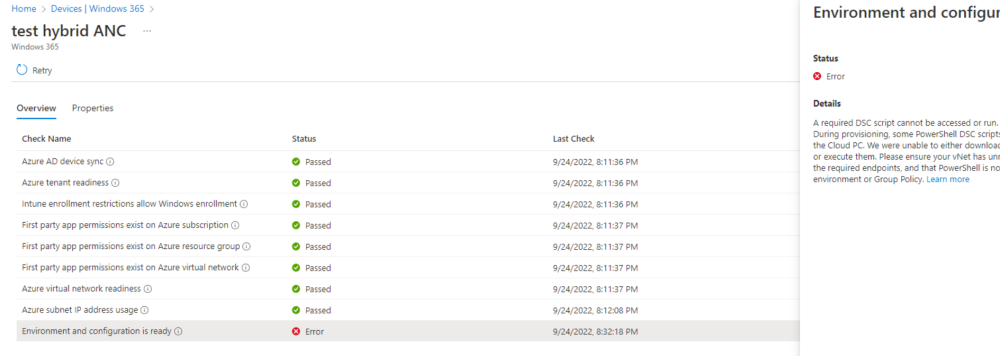
Note: If you see Checks failed, click on it to review what failed. More than likely DNS settings (and static route) to your on-premises infrastructure is not correct or not working, below is an example of that. Thanks to Donna and Richard Hicks for their help with troubleshooting. We found that the best way to troubleshoot issues like this is to spin up an Azure Virtual Machine in the same Resource Group and Virtual Network as you are working with. If that VM cannot access your on-premises DNS then the ANC checks will fail.
Provision a Hybrid Azure Ad joined Cloud PC
Once the ANC above is created successfully you should be ready to provision your Hybrid Azure Ad joined Cloud PC. To do that, in Endpoint Manager click on the Devices, select the Windows 365 node, and then select Provisioning Policies.
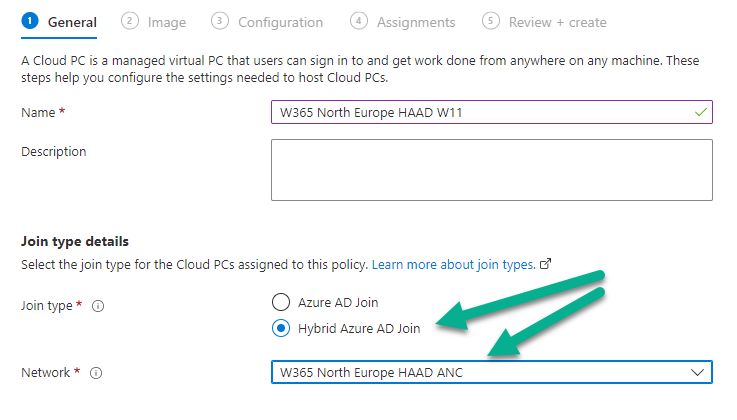
Next, click on + Create policy and select Hybrid Azure AD Join as the Join type and select the W365 North Europe HAAD ANC from the Network drop down menu.
fill in your image details, and continue through the wizard until completion.
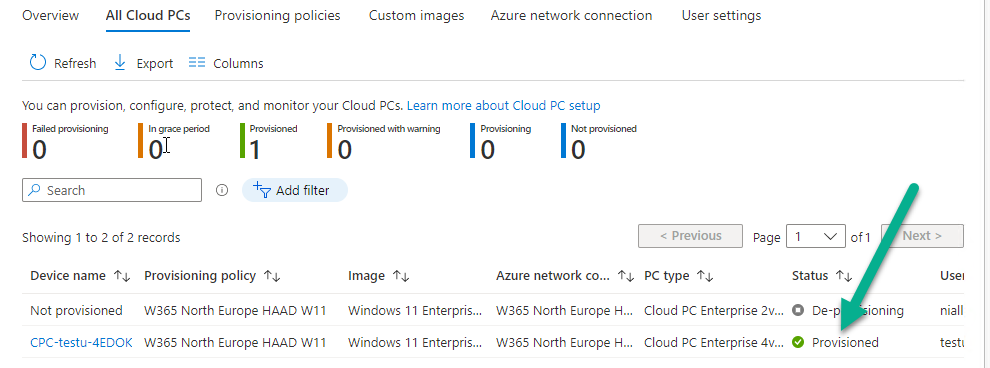
Now all that’s required is to add one or more licensed users into the target Azure AD group and access your Hybrid Azure AD Joined Cloud PC. Below is a screenshot of that.
The provisioning of that users Cloud PC should begin and if all goes well, succeed !
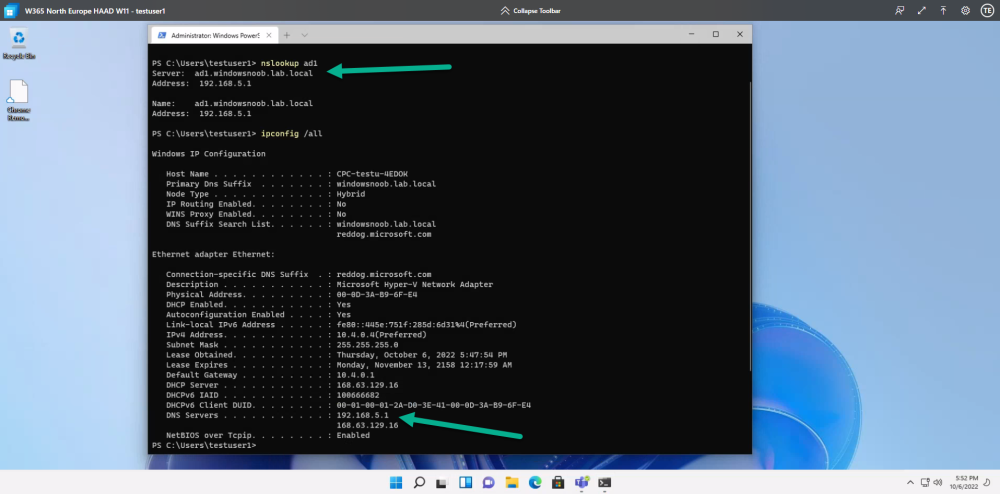
Logging on to the Cloud PC should also reveal its ability to use to on-premises resources (such as DNS)
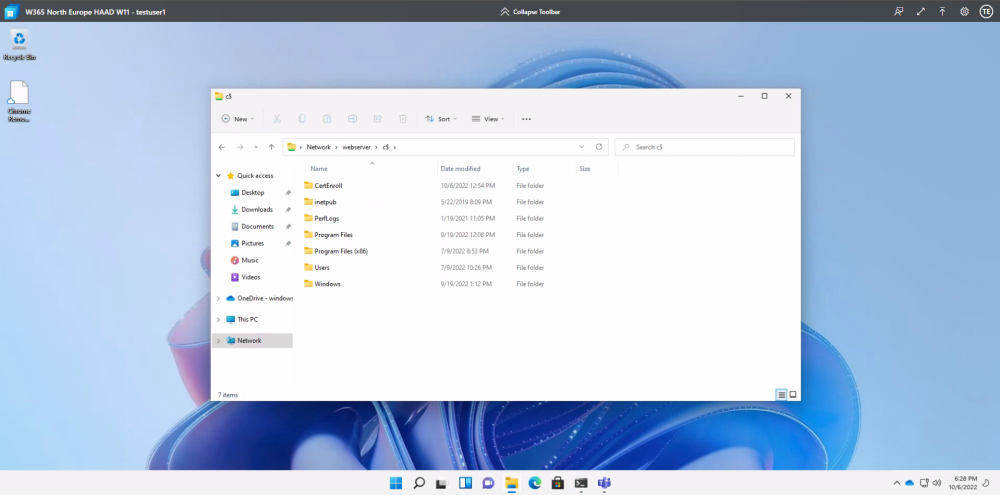
and the ability to access network shares on another server in the on-premises Domain.
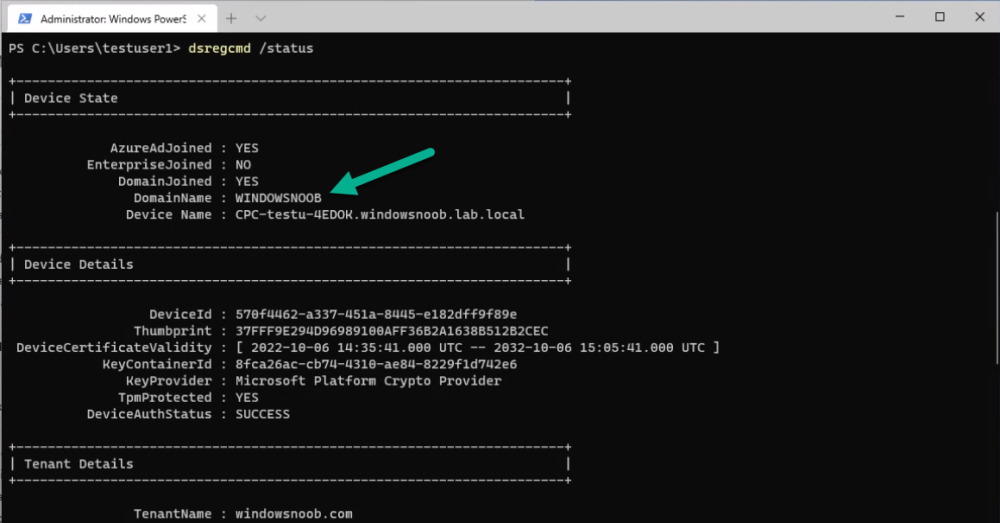
Remember that domain join account ? Well you can also see that the Cloud PC is domain joined
Job done !
Related reading
- https://docs.microsoft.com/en-us/windows-365/enterprise/requirements-network
- About VPN devices for connections – Azure VPN Gateway | Microsoft Docs
- Tutorial – Connect an on-premises network and a virtual network: S2S VPN: Azure portal – Azure VPN Gateway | Microsoft Docs
- https://charbelnemnom.com/create-site-to-site-vpn-between-azure-and-windows-rras-server/



selected.png.a9a082fe60272dd81482dc77b1891383.png)
