Introduction
This is Part 5 in a new series of guides about getting started with Windows 365. This series of guides will help you to learn all about Windows 365 in a clear and insightful way. This series is co-written by Niall & Paul, both of whom are Enterprise Mobility MVP’s with broad experience in the area of modern management. At the time of writing, Paul is a 6 times Enterprise Mobility MVP based in the UK and Niall is a 12 times Enterprise Mobility MVP based in Sweden. In this series we aim to cover everything we learn about Windows 365 and share it with you to help you to deploy it safely and securely within your own organization. In Part 1 we introduced you to Windows 365, selecting the right edition with the level of management that you need, choosing the plan that suits your users needs at a cost you can afford, or modifying the configuration to make it more suited to your individual needs, purchasing licenses and saving money for your organization via the Windows Hybrid Benefit. In Part 2 you learned how to provision an Azure Ad joined Cloud PC and take a look at the different network options available when provisioning an Azure Ad joined Cloud PC. In Part 3 you learned about the steps needed to successfully provision a Hybrid Azure Ad Joined Cloud PC. In Part 4 you saw the many different ways you can connect to your Cloud PC from many device be it Android, Mac, Windows, Linux or iPhone and you learned that not all connection options have the same abilities.
The management capabilities of your Cloud PCs are dependent on which edition of Windows 365 you purchase. If you want rich device management, go with Windows 365 Enterprise. If your business is small (less than 300 employees) use the Windows 365 Business option and it’s associated (limited) management. Cloud PC’s from Microsoft have come about from traditional Desktop as a Service (DaaS) offerings (providing a Windows experience for end users with little or no overhead for IT admins) and an evolution from PaaS offerings (such as Azure Virtual Desktop).
Microsoft’s definition of Cloud PC is defined as a Windows experience delivered in an elastic way from the cloud while maintaining their full security posture and flexibility and user experiences that they see in the physical world. That flexibility and maintenance is of course done via management and that’s our focus in this blog post, managing your Cloud PC’s whether you are using the Business or Enterprise edition of the product.
Below you can find all parts in this series:
-
- Getting started with Windows 365 – Part 1. Introduction
- Getting started with Windows 365 – Part 2. Provisioning an Azure Ad Joined Cloud PC
- Getting started with Windows 365 – Part 3. Provisioning a Hybrid Azure Ad Joined Cloud PC
- Getting started with Windows 365 – Part 4. Connecting to your Cloud PC
- Getting started with Windows 365 – Part 5. Managing your Cloud PC <- you are here
- Getting started with Windows 365 – Part 6. Point in time restore
- Getting started with Windows 365 – Part 7. Patching your Cloud PCs with Windows Autopatch
- Getting started with Windows 365 – Part 8. Windows 365 boot
- Getting started with Windows 365 – Part 9. Windows 365 switch
- Getting started with Windows 365 – Part 10. Windows 365 offline
In this part we’ll cover the following:
- Different abilities between editions
- Management capabilities for Windows 365 Business
- Sign up for a Windows 365 Business Trial
- Assigning a user an administrative role
- Abilities in the Windows365 portal
- Management capabilities for Windows 365 Enterprise
- Quick overview of features in Intune
- Cloud PC related actions on Windows 365 devices
- Configure Alerts for Windows 365 related issues
- Custom Windows 365 role-based access control (RBAC) roles
- Management capabilities via Powershell
- Create Enterprise app
- Configure permissions
- Grant consent
- Script samples
- Recommended reading
- Summary
Different abilities between editions
In Part 1 of this blog series we highlighted the main differences between the 2 editions. The following table further outlines the different capabilities (including management capabilities) between Windows 365 Business and Windows 365 Enterprise editions. It’s clear that if you want image management, device management, connection to on-premises network resources, reporting, monitoring and more that Windows 365 Enterprise is the right choice.
Management capabilities for Windows 365 Business
Windows 365 comes in two flavors, Windows 365 Business, or Windows 365 Enterprise. With the Enterprise edition you get Intune device management and more included. With the Business edition you are limited to actions (listed below) in the Windows 365 portal or remote actions via the admin console. As there is no Intune management included, there are no licensing prerequisites to set up Windows 365 Business.
Sign up for a Windows 365 Business Trial
If you’d like to try out the Windows 365 Business for yourself to test Cloud PC’s and the management capabilities available to Windows 365 Business, you can sign up for a free 30 days trial if you are in a region where trials are offered. Below are 2 applicable regions (there may be more) where the trial period is currently valid at the time of writing. We signed up for the UK trial.
- US – https://www.microsoft.com/en-us/windows-365/business/compare-plans-pricing
- UK – https://www.microsoft.com/en-gb/windows-365/business/compare-plans-pricing
For a list of management capabilities for the Business edition via windows365.microsoft.com see below:
- Add a user and assign a license.
- Assign or unassign licenses.
- Change organization default settings.
- Use remote actions on Cloud PCs.
- Reset a user’s password.
Assigning a user an administrative role
To avail of this management ability for Windows 365 Business, you’ll need a user to be assigned either of the following roles:
- Global Administrator
- Windows 365 Administrator
In our testing however, there are some scenarios where you’ll need more than just the Windows 365 Administrator role and we’ve asked the Microsoft Product Group for comment. We’ll update this blog post when we have more clarity on that.
You can assign these RBAC (Role Based Access Control) roles via the admin.microsoft.com portal as a Global Administrator or if the customer has access to Azure Active Directory.
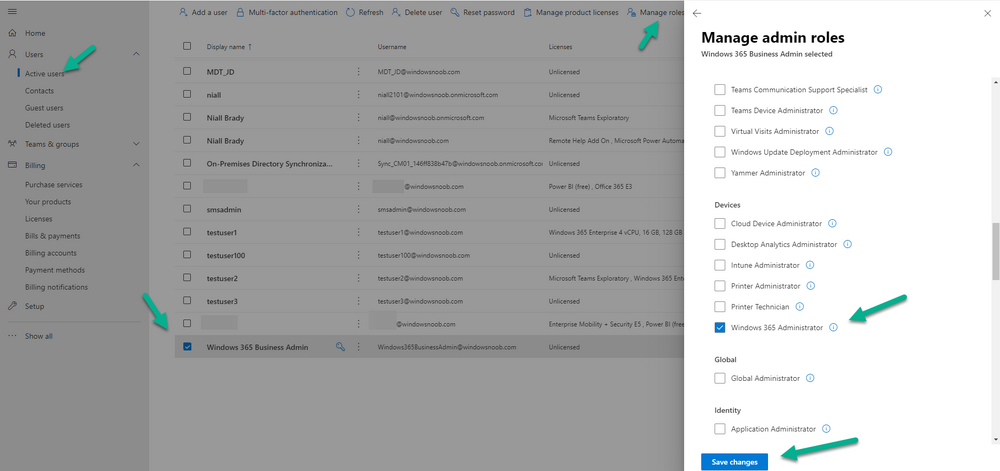
To apply the Windows 365 Administrator role using the admin.microsoft.com portal, login as a Global Administrator and click on Users, select Active Users, select the user in question, click on Manage Roles and scroll down to Devices and select the Windows 365 Administrator role before selecting Save Changes.
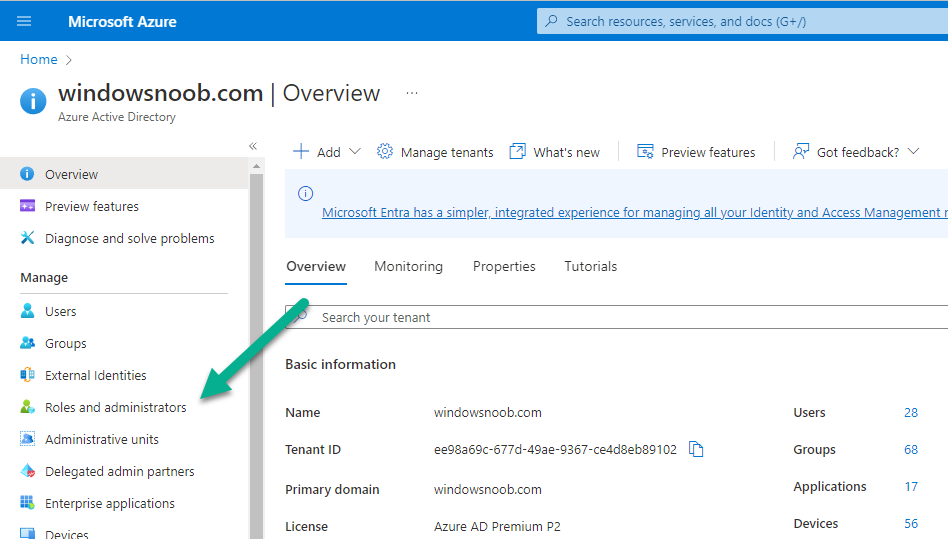
To apply the role to a user in Azure AD, login as Global Administrator, select Roles and administrators
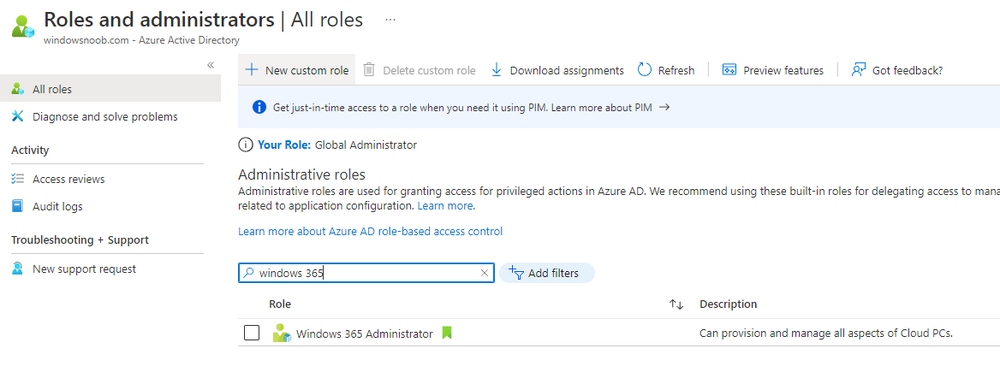
Search for the appropriate role, in this example we will apply the Windows 365 Administrator role.
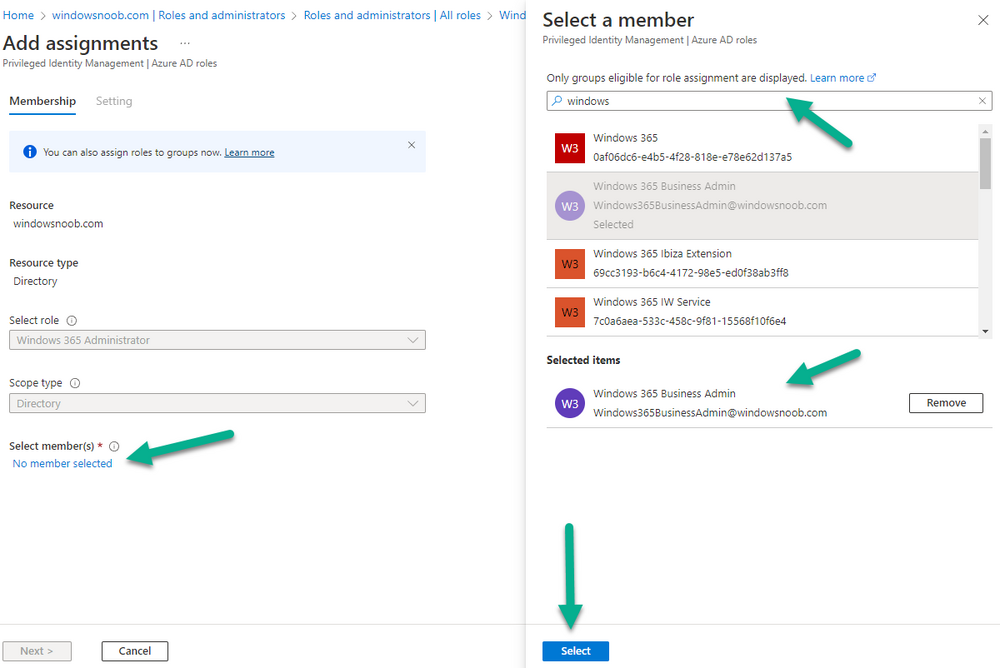
Click on + Add assignments and then click on No member selected to add at least one member to this role.
Note: If your Windows 365 business admin user does not have either of those roles assigned, then none of the remote actions or additional abilities will be available or visible on windows365.microsoft.com or admin.microsoft.com. We noted that in order to see anything in the admin portal you’d also need to assign the Global Reader role in addition to the Windows 365 Administrator role.
Abilities in the Windows365 portal
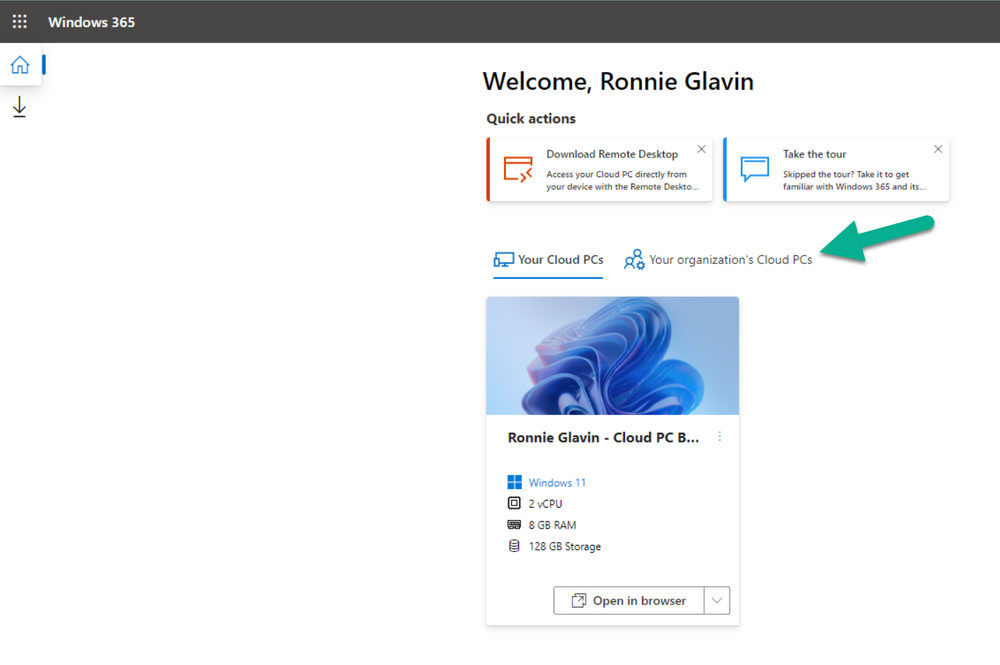
Here we can see a typical view of the windows365.microsoft.com portal and the management capabilities available to a user with one of the roles mentioned above for Windows 365 Business. In this view we can see an additional tab called Your organization’s Cloud PCs.
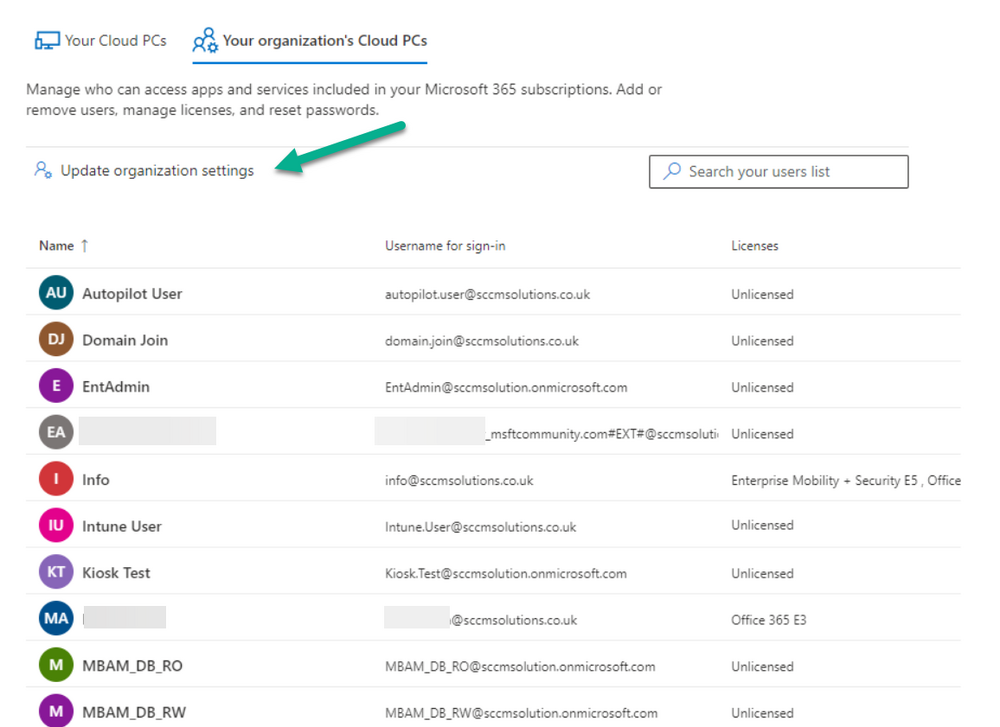
Clicking on Your organization’s Cloud PCs reveals a list of users in your organization and their assigned licenses and it reveals another option to Update organization settings.
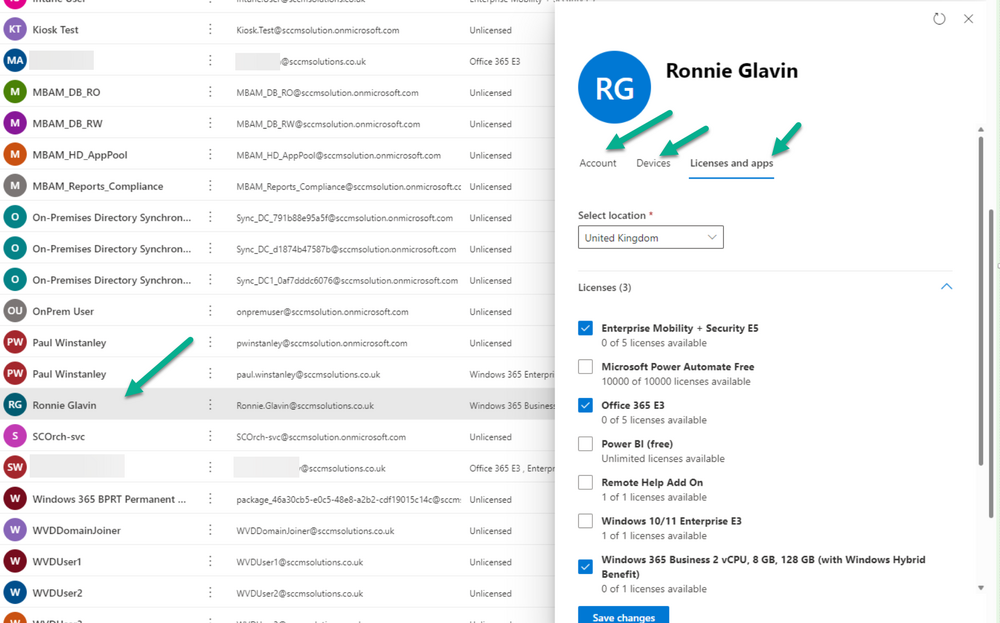
From this view the admin can select to manage users by clicking on them directly and accessing the options available, this gives you access to add users, reset passwords, update organization settings or do remote actions on users Cloud PCs all from one place. For example in the screenshot below, clicking on the account the devices or even the licenses and apps tabs will show additional options available for that user.
Note: You can only add/remove Licenses if you are logged in with a user that has the appropriate role, for example a Global Administrator or License Administrator role.
Management capabilities for Windows 365 Enterprise
Windows 365 Enterprise management capabilities take place in Microsoft Intune and as such Intune licensing is required. Windows 365 Enterprise Cloud PC’s are managed by Intune so anything you can do in Intune is possible on your Cloud PC’s, with a few exceptions currently, such as BitLocker encryption. Logging in to the Microsoft Endpoint Manager portal you can see Windows 365 Enterprise Cloud PC management in various places, so let’s take a look at where you can find it.
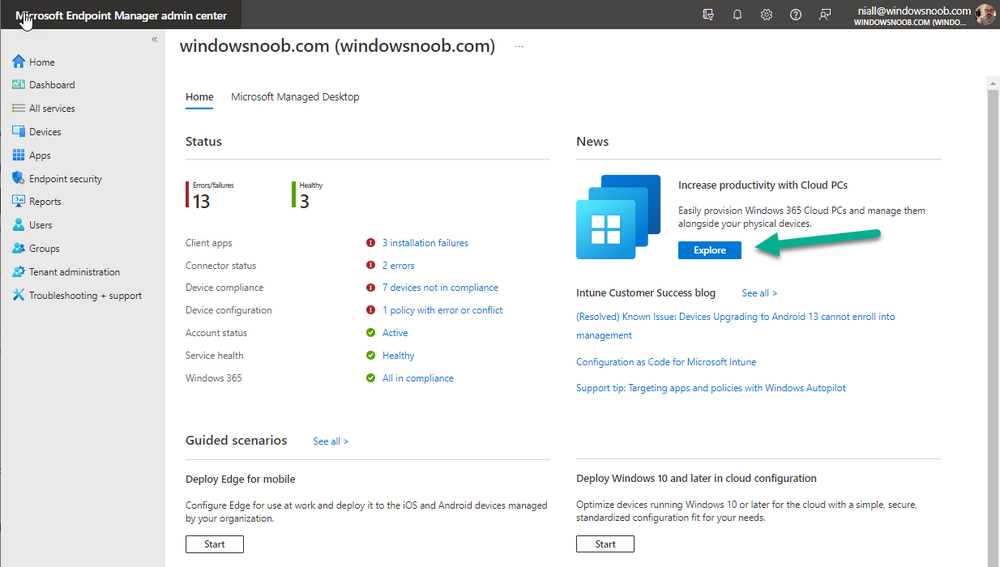
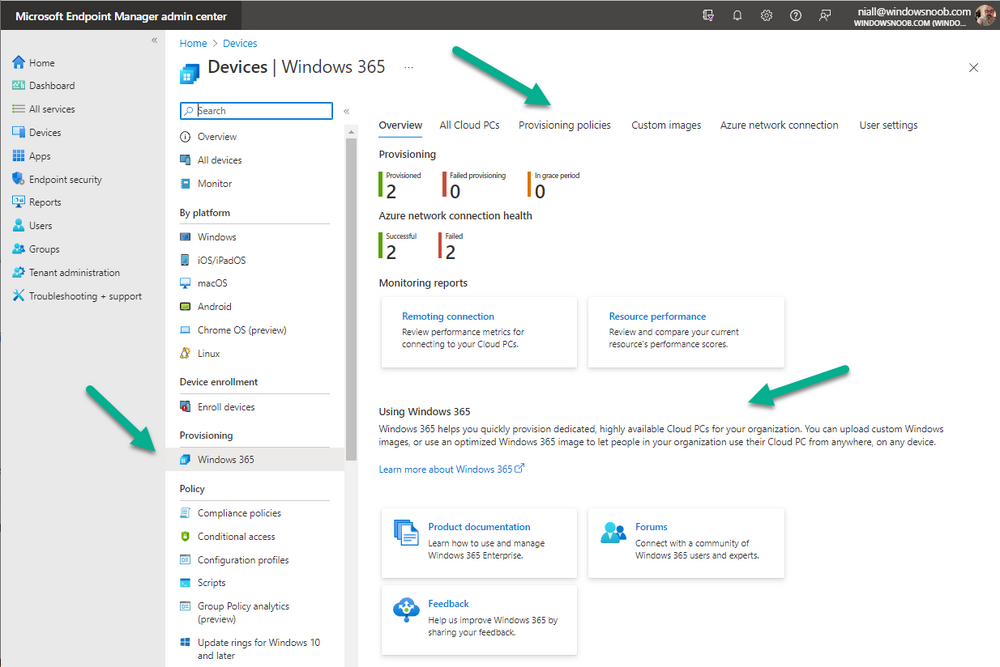
In the portal you can get Windows 365 information easily by clicking on Explore
This brings you directly to the Windows 365 provisioning area in Intune which also contains monitoring reports and links to product documentation and forums.
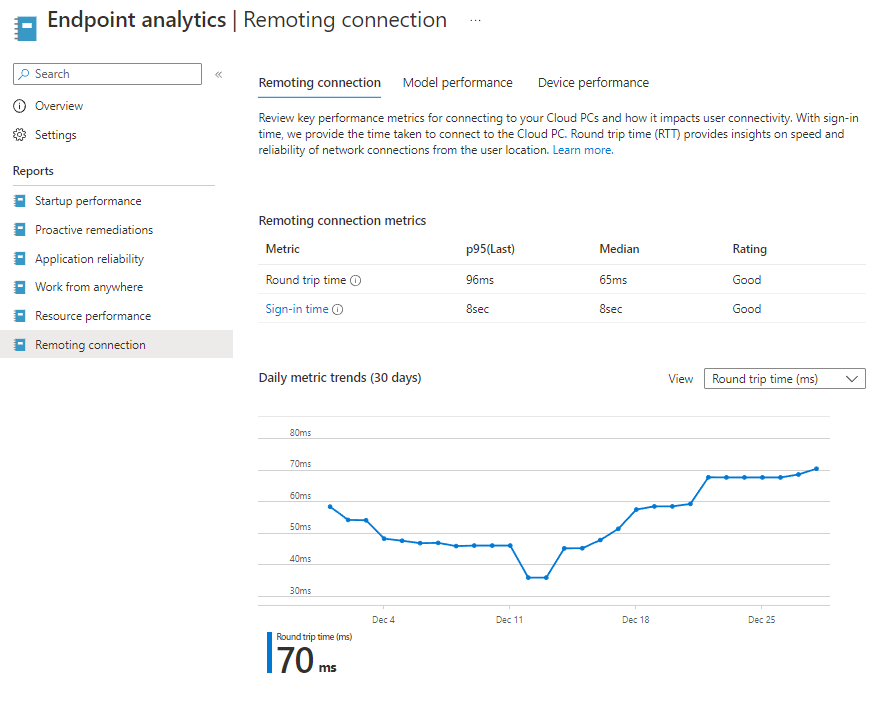
For example, the Remoting connection link brings you directly to Endpoint Analytics reports with lots of useful data.
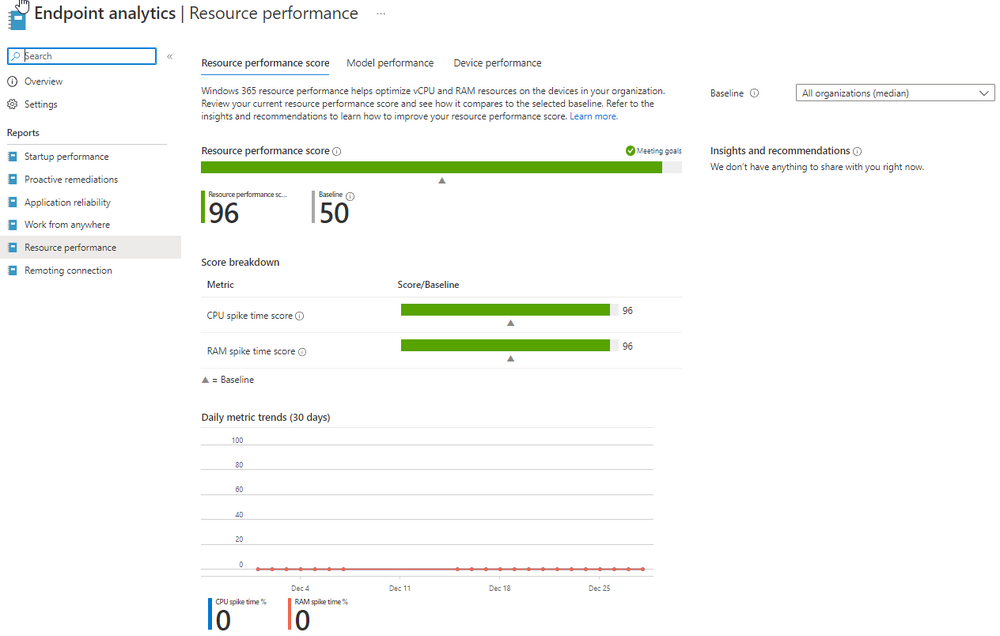
and we also have Resource performance.
In addition to the above, Windows 365 management is visible in other areas, while we can’t take a look at all of them let’s review a few.
Cloud PC related actions on Windows 365 devices
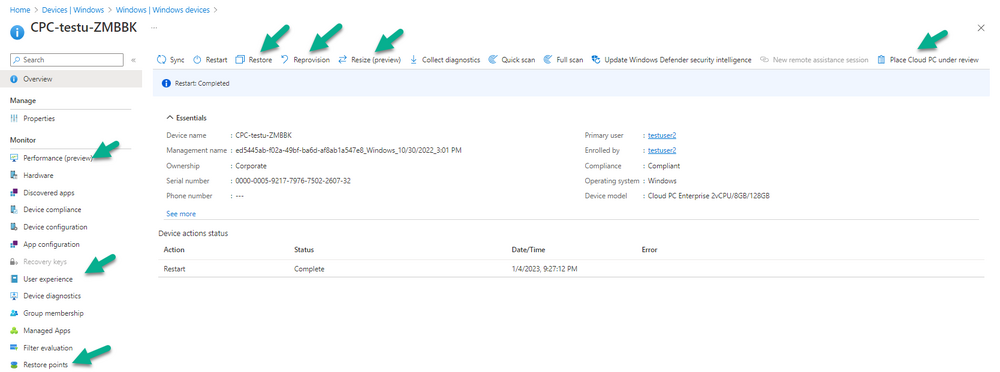
In addition to the standard actions available to regular devices there are several Windows 365 actions available for Cloud PCs in the Intune portal. The following actions are available on the Overview page after selecting a Cloud PC.
- Restore
- Reprovision
- Resize (preview)
- Place Cloud PC under review
and in the left node you have additional related actions such as:
- Performance (preview)
- User experience
- Restore points
User experience is available on non Cloud PC’s also however Cloud PC’s will also see two additional tabs namely
- Resource performance
- Remoting connection
It’s also worth noting that at the time of writing that Recovery keys are greyed out (not available) for Cloud PCs and that is because Bitlocker encryption is not currently supported (but is on the roadmap).
Custom Windows 365 role-based access control (RBAC) roles
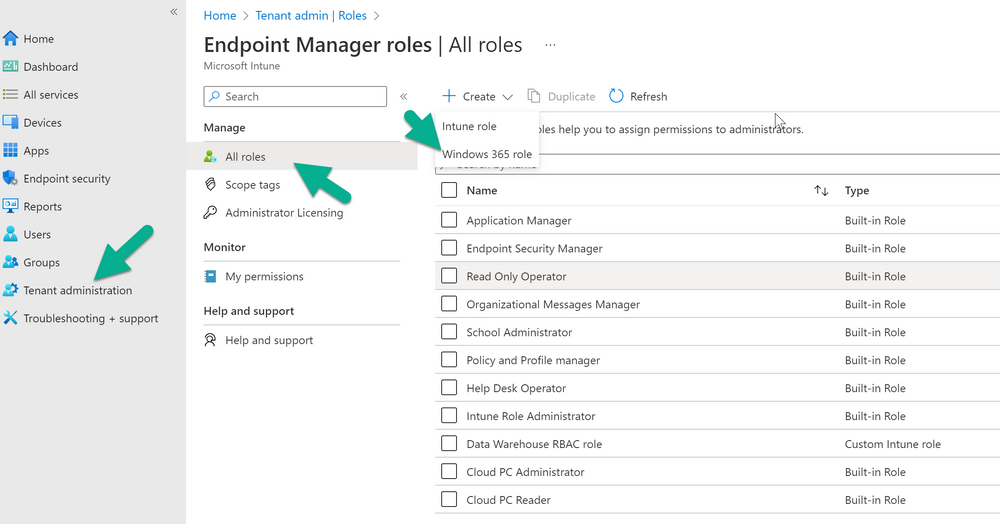
You can create custom RBAC roles for Cloud PC management as explained here. In Tenant administration, click on Roles, select All Roles, click on + Create and select Windows 365 role.
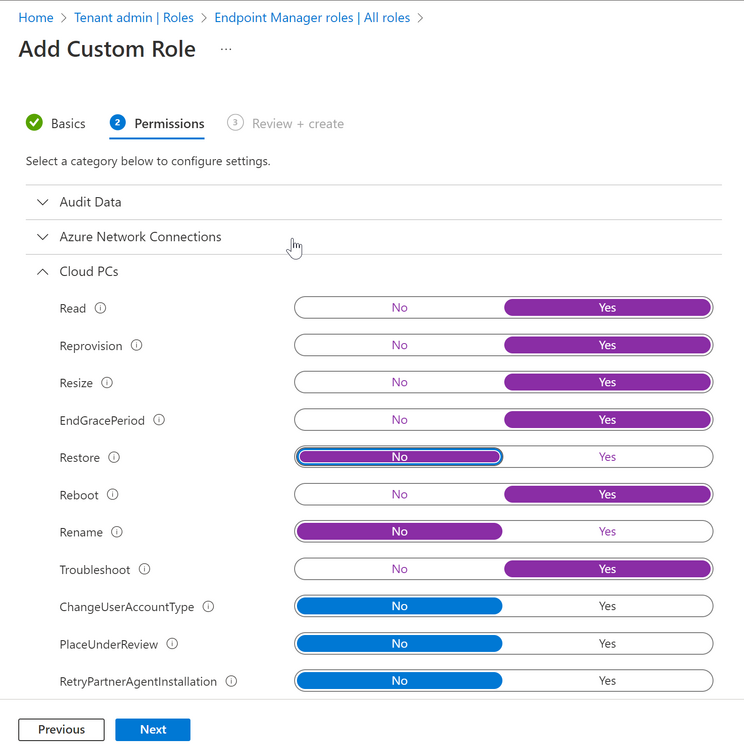
Once there, select the abilities you want this role to have access to.
Configure Alerts for Windows 365 related issues
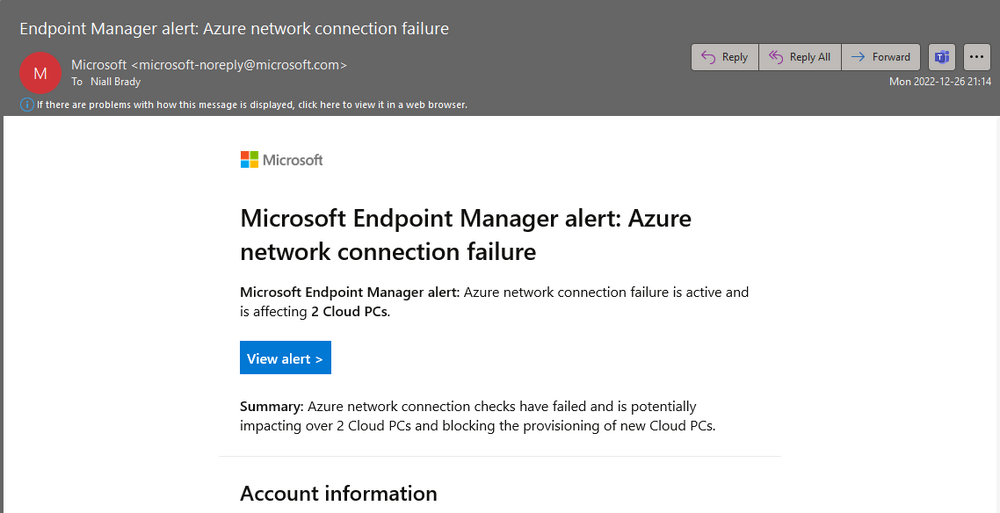
You can now configure alerts in Intune to notify your admins via email about problems occurring with your Windows 365 Cloud PCs. The following Windows 365 based alert rules are currently available at the time of writing (January 2023)
- Azure network connection failure
- Upload failure for custom images
- Provisioning failure impacting Cloud PCs
For details about configuring these alerts see here.
Management capabilities via Powershell
You can do most Windows 365 Cloud PC tasks automatically using PowerShell via Microsoft Graph. To use this automation however you need to fulfill some requirements.
- Create an Enterprise app
- Configure permissions
- Grant consent
Note: Please note that in this example we will use client secrets as it’s in a lab, however in production environments please use Azure Key vault to keep this access secure.
Create an Enterprise App
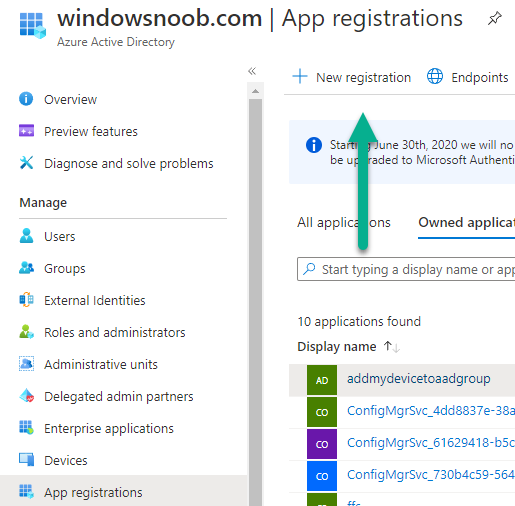
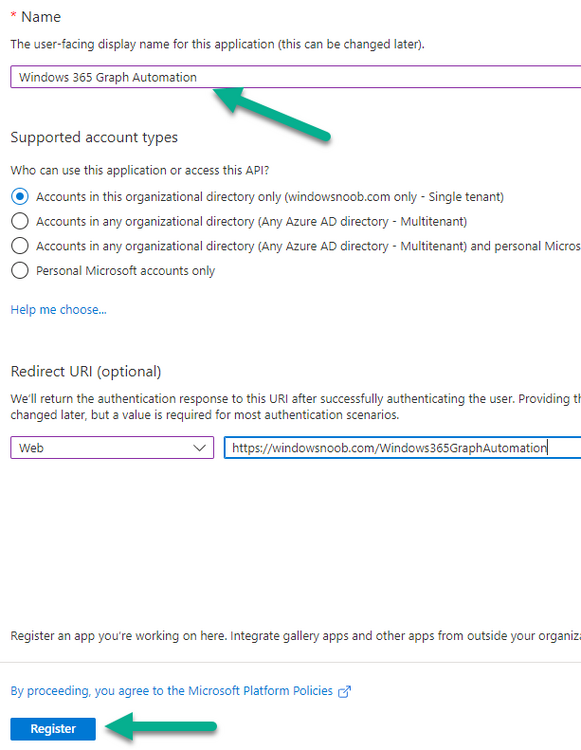
We’ll use app registrations in Azure AD to create an Enterprise app that allows us to use Microsoft Graph to carry out our automation work. In Azure AD go to App registrations. Click on + New registration.
In the new app registration, give it a useful name like Windows 365 Graph Automation so that you know what it is for, and choose Accounts in your tenant (first option), and optionally select Web from the Redirect URI (optional)+ choices and point it to a localhost address or one that you have available. Finally click on Register.
Next, you’ll want to add a secret by clicking on Add a certificate or secret, and then once the secret has been created, copy the following values from this app registration as we’ll need them in our PowerShell scripts:
- Application (client) ID
- Directory (tenant) ID
- Client credentials (certificate or secret)
Below you can see the secret is created and copied, store that info somewhere safe.
Review Permissions
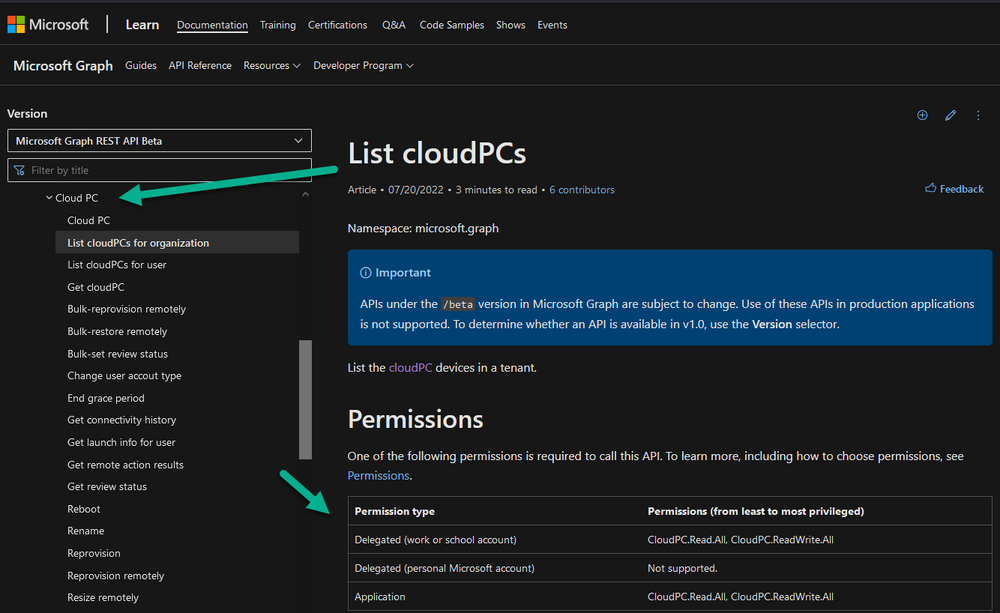
To review the permissions see the Graph API Documentation for what permissions are needed, keep in mind that these are currently in Beta and subject to change.
Those permissions are basically broken down into three areas, License, Group and Cloud PC
License permissions
- User.ReadWrite.All
- Directory.ReadWrite.All
Group permissions
- GroupMember.ReadWrite.All,
- Group.ReadWrite.All
- Directory.ReadWrite.All
CloudPC permissions
- CloudPC.ReadWrite.All
But before we get started with those permissions we need to create an App registration.
Configuring API permissions
To configure API Permissions for the your app API, Click API permissions, then click + Add a permission, select Microsoft Graph, select Application permissions
Next, add the following:
- User.ReadWrite.All
- Group.ReadWrite.All
- GroupMember.ReadWrite.All
- CloudPC.ReadWrite.All
- Directory.ReadWrite.All
The permissions are now added
Grant consent
Don’t forget to Grant admin consent for your Tenant after doing so otherwise this won’t work.
after clicking on Yes you can see the scripts are granted
Sample scripts
We recently hosted a session about troubleshooting Hybrid Azure AD joined Cloud PC’s in a USA Cloud PC meetup. Before our session Dawn Wertz did a demo about this automating Cloud PC actions with Graph and PowerShell. She very kindly provided her sample scripts that she used during her demo and you can download them yourself below. We’d highly recommend that you review the included PowerPoint (thanks Dawn) and video.
You can download the scripts (and PowerPoint) here. Windows 365 Cloud PC Powershell samples.zip
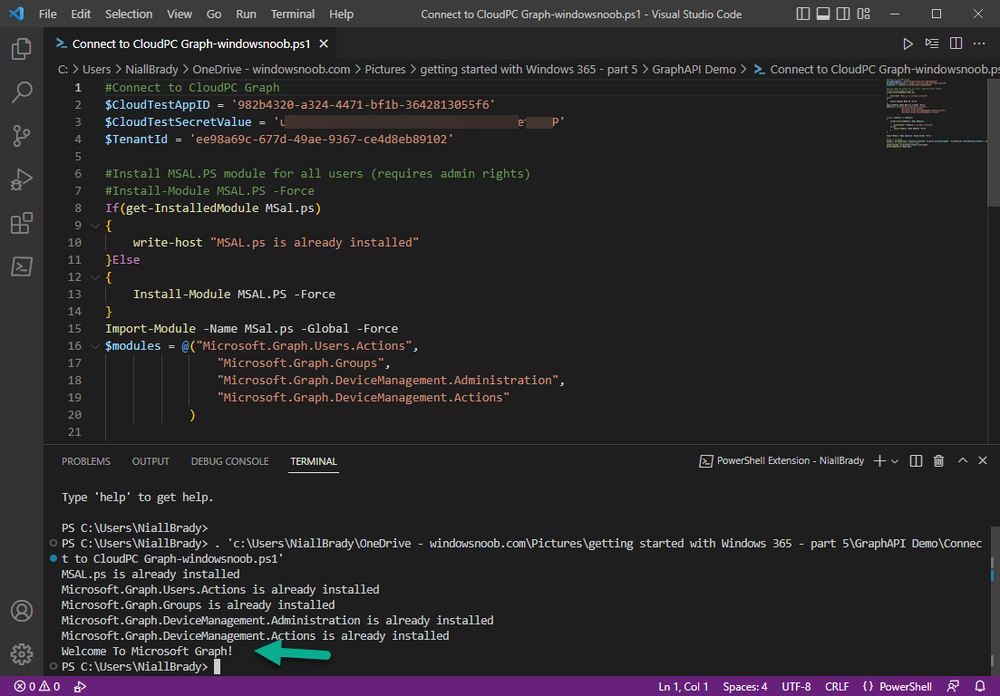
After editing one of the scripts in Visual Studio Code and adding the missing info (tenant id, app id, secret on lines 2-4) we could easily connect to Microsoft Graph.
Once connected, it’s possible to run commands such as list all the Cloud PCs.
and the output proves it’s working.
Recommended reading
- Get started with Windows 365 Business – https://techcommunity.microsoft.com/t5/windows-it-pro-blog/get-started-with-windows-365-business/ba-p/2595485
- Remotely manage Windows 365 Business Cloud PCs – https://learn.microsoft.com/en-us/windows-365/business/remotely-manage-business-cloud-pcs
- Device management overview for Cloud PCs – https://learn.microsoft.com/en-us/windows-365/enterprise/device-management-overview
- Graph API permissions for Windows 365 Cloud PCs – https://learn.microsoft.com/en-us/graph/api/virtualendpoint-list-cloudpcs?view=graph-rest-beta&tabs=http
- Azure Key vault – https://learn.microsoft.com/en-us/azure/key-vault/general/overview
- Visual Studio code – https://code.visualstudio.com/Download
- Powershell with VisualStudioCode – https://code.visualstudio.com/docs/languages/powershell
- Custom Windows 365 role-based access control (RBAC) roles – What’s new in Windows 365 Enterprise | Microsoft Learn
Summary
Managing Cloud PC’s as an Admin is possible via a variety of different methods and depending on your subscription level and level of expertise. Windows 365 Business admins can manage their Cloud PC’s via two main methods, the Windows365 portal and admin.microsoft.com. Windows 365 Enterprise admins get feature rich device management via Microsoft Intune and can automate repetitive actions using PowerShell scripts and Microsoft Graph. The possibilities are endless !


