Introduction
At the start of this series of step by step guides you installed System Center Configuration Manager (Current Branch), then you configured discovery methods. Next you configured boundaries to get an understanding of how automatic site assignment and content location works. After that you learned how to update ConfigMgr with new features and fixes using a new ability called Updates and Servicing and you learned how to configure ConfigMgr to use Updates and Servicing in one of these two modes:
To prepare your environment for Windows 10 servicing (this guide) you learned how to setup Software Updates using an automated method (via a PowerShell script) or manually using the ConfigMgr console. Next you used a PowerShell script to prepare some device collections, then you configured client settings for your enterprise and finally you’ll deployed the ConfigMgr client agent using the software updates method which is the least intensive method of deploying the Configuration Manager client agent.
As System Center Configuration Manager (current branch) is being delivered as a service now, version 1602 was made available (March 11th, 2016) and you used Updates and Servicing to do an in-place upgrade to that version as explained here. Next you learned about how to use the Upgrade task sequence to upgrade your Windows 7, Windows 8 (and 8.1) and even your Windows 10 devices to a later build of Windows 10.
You then learned about the new Windows 10 servicing features which use Servicing Plans in ConfigMgr (Current Branch). Next you integrated MDT 2013 update 2. MDT integration with ConfigMgr is useful as it provides additional functionality for operating system deployment scenarios such as Offline Language Package installation or User Driven Integration (UDI).
Next you learned how to deploy Language Packs offline for Windows 10. To assist with Windows 10 servicing and for applying appropriate software updates to your Windows 10 devices, you used PowerShell to add queries to the various Windows 10 collections.
Next you took a deeper look at the Windows 10 Upgrade task sequence, and learned one way of dealing with potential upgrade issues. While that method will flag a problem, such as determining the system UI language doesn’t match the provided media, it won’t allow you to continue with the upgrade.
This post will show you one method to upgrade the operating system, provided that the system UI language is from a ‘list’ of approved languages that you intend to support.
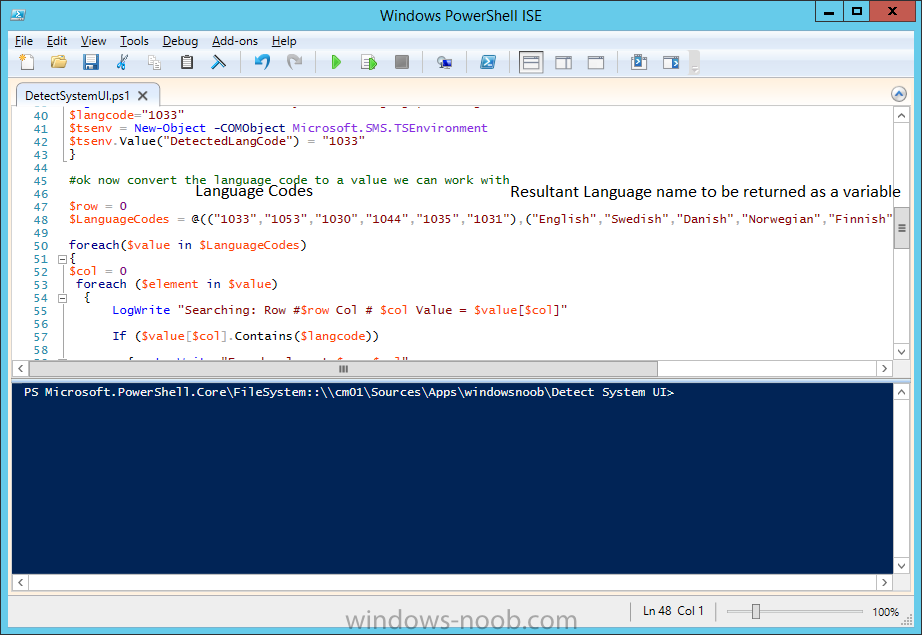
This method uses a PowerShell script that runs the below query to check for the language installed
([wmi]"root\cimv2:win32_OperatingSystem=@").OSLanguage
It then compares that result to your approved list of language codes (and resulting names, eg: 1033=English). The section of the PowerShell script that you can edit to expand/reduce this functionality is highlighted below.
Just make sure that the Language Code listed on the left, matches the Language Variable name that you want to return to the task sequence as a variable, a full list of these potential values is here in the Language Codes section.
Once the script has run, it will set a variable that can be checked for in the task sequence, the variable is called DetectedLangCode.
Note: There are at least three methods dealing with Language Packs installed in Windows 10 for the Upgrade Task Sequence, this is one method. If i get time i’ll blog the other methods too (however they are less supported than this method). The downside to this method is that you need one media step for each language installed (including an additional step if using the Windows setup compatibility scan).
Step 1. Create a package
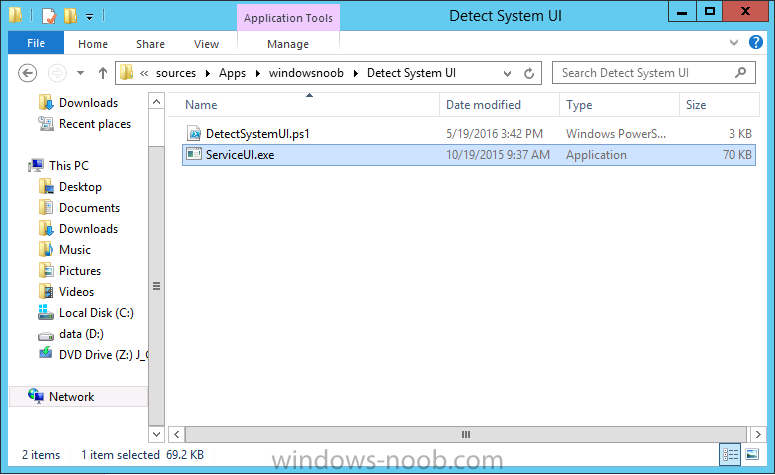
On your ConfigMgr server, in the sources share, create a folder called Detect System UI and place the DetectSystemUI.ps1 PowerShell script in the folder. Even though you are deploying an X64 operating system, locate, select and copy ServiceUI.exe from the Sources\OSD\MDT\MDT2013u2\Toolkit\Tools\x86 folder into the Detect System UI folder as shown below.
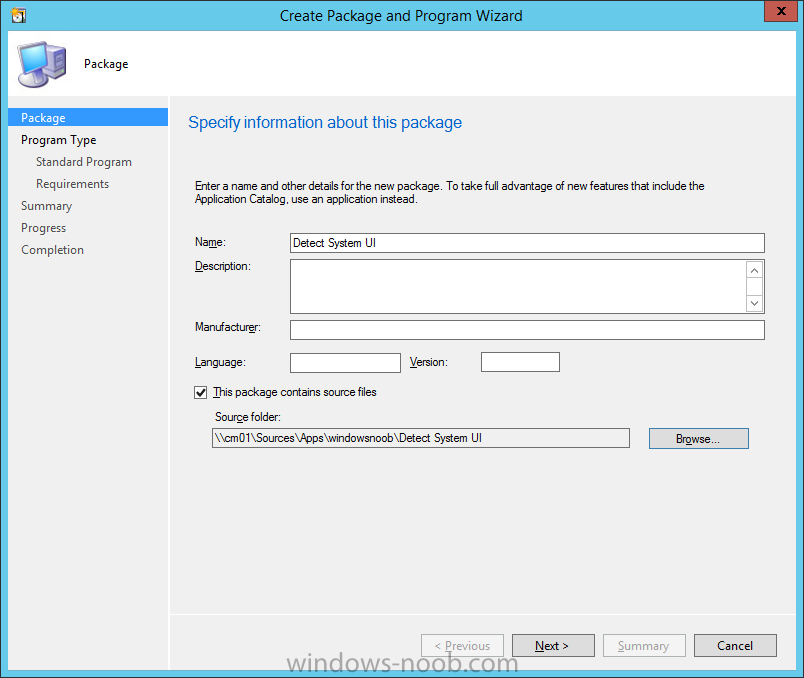
In the ConfigMgr console, Software Library, select Packages and right click, choose Create Package. Fill in the following details,
Choose Do not create a program and then continue through the wizard until completion.
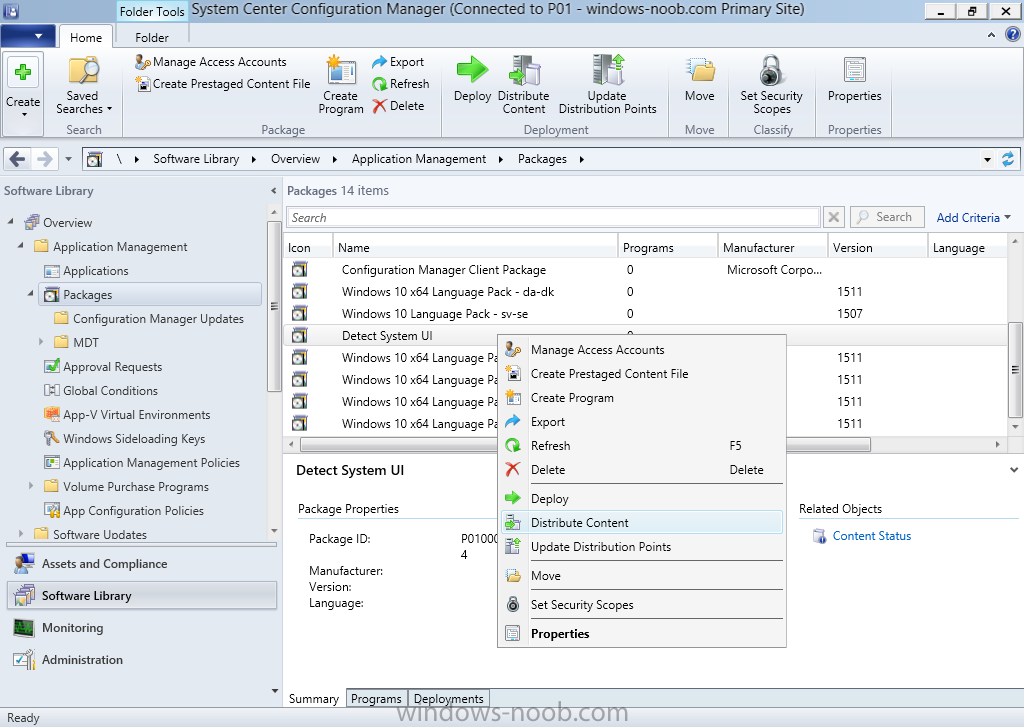
Once the package is created, right click the package and choose Distribute Content. Distribute the package to your distribution points.
Step 2. Create Windows 10 Upgrade Packages for the languages you intend to support.
Logon to your Microsoft Volume License site and download the correct version of the Windows 10 1511 (Feb 2016 update) media that is available in each language that you intend to support, so if you have 10 languages to support, you need all 10 media isos.
Once downloaded, add the media as a new Windows 10 Upgrade Package into ConfigMgr. To add Windows 10 version 1511 as an operating system upgrade package do as follows:
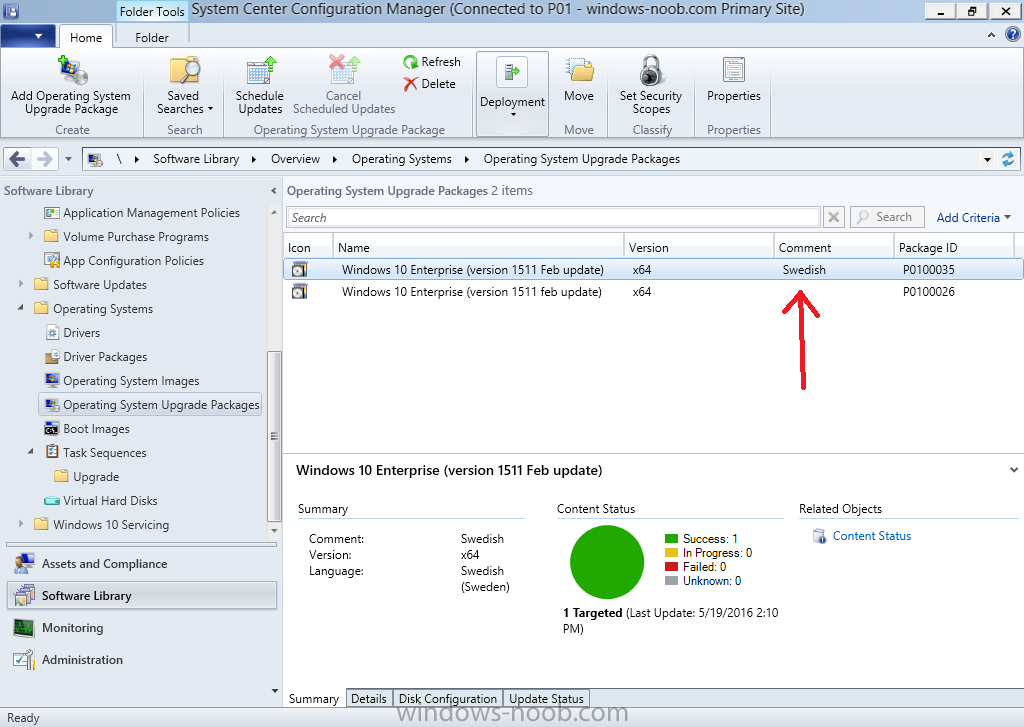
In the Configuration Manager console, click Software Library and expand Operating Systems then click Operating System upgrade packages. Right click on Operating System upgrade packages and choose Add Operating System upgrade package. When the wizard appears fill in the UNC path to the media and click on next, make sure to fill in a comment to note the language of the media. Once done creating the package update it to your Distribution Points.
Rinse and repeat for each language you intend to support.
Step 3. Edit the task sequence to determine system UI language
By default, after creating an upgrade task sequence you’ll have one language media added (probably English). However, if you deploy Windows 10 language packs offline or install the language pack in such as way as to change the UILanguage in the unattend.xml, the installed language pack (for example Swedish) will be set as the system UI language even if the base operating system language was English.
The PowerShell script at the bottom of this guide can be run to set a variable at the start of the task sequence and the task sequence will utilize this variable to allow the process to continue with the Upgrade task sequence without failing over. In this guide you will use the Upgrade task sequence created in the previous guide.
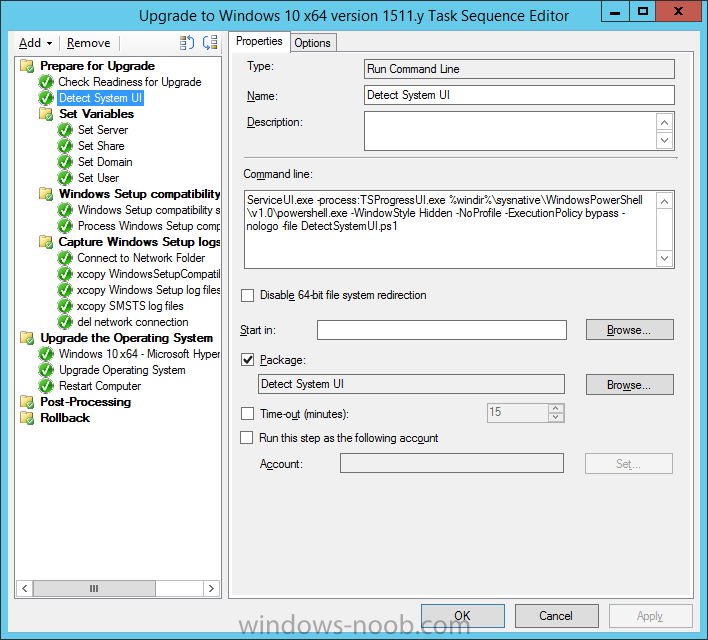
In the Prepare for Upgrade group select the Check Readiness for upgrade step, click Add and choose Run Command Line, name the step Detect System UI and paste in the following:
ServiceUI.exe -process:TSProgressUI.exe %windir%\sysnative\WindowsPowerShell\v1.0\powershell.exe -WindowStyle Hidden -NoProfile -ExecutionPolicy bypass -nologo -file DetectSystemUI.ps1
For Package, select the Detect System UI package created above.
Step 4. Edit the task sequence to set the Windows Setup Compatibility scan languages
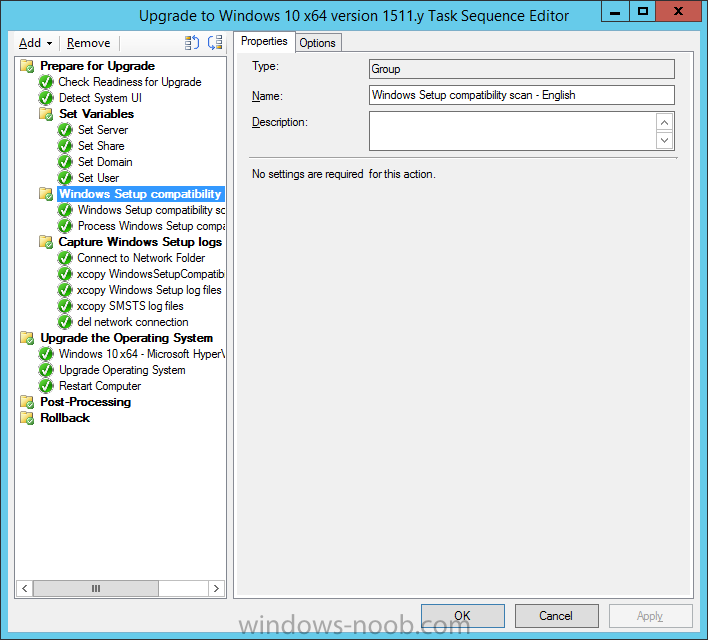
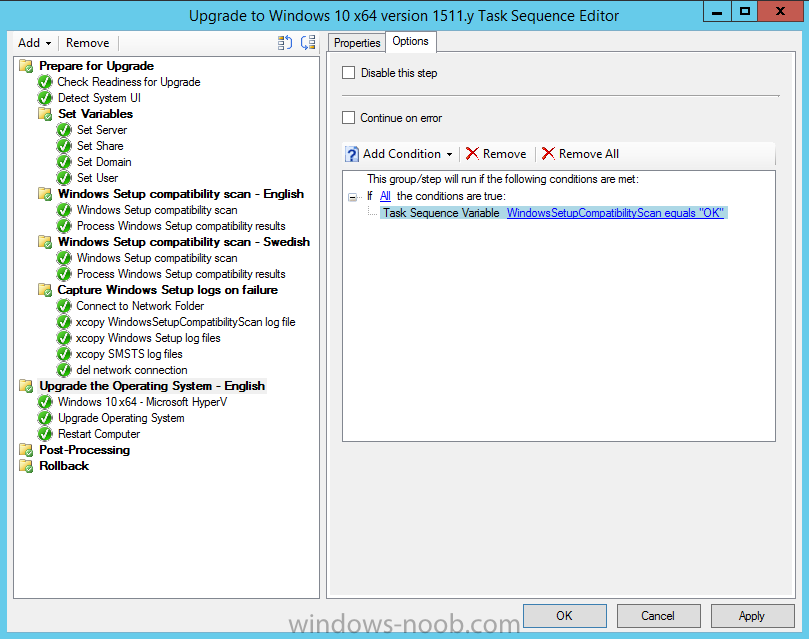
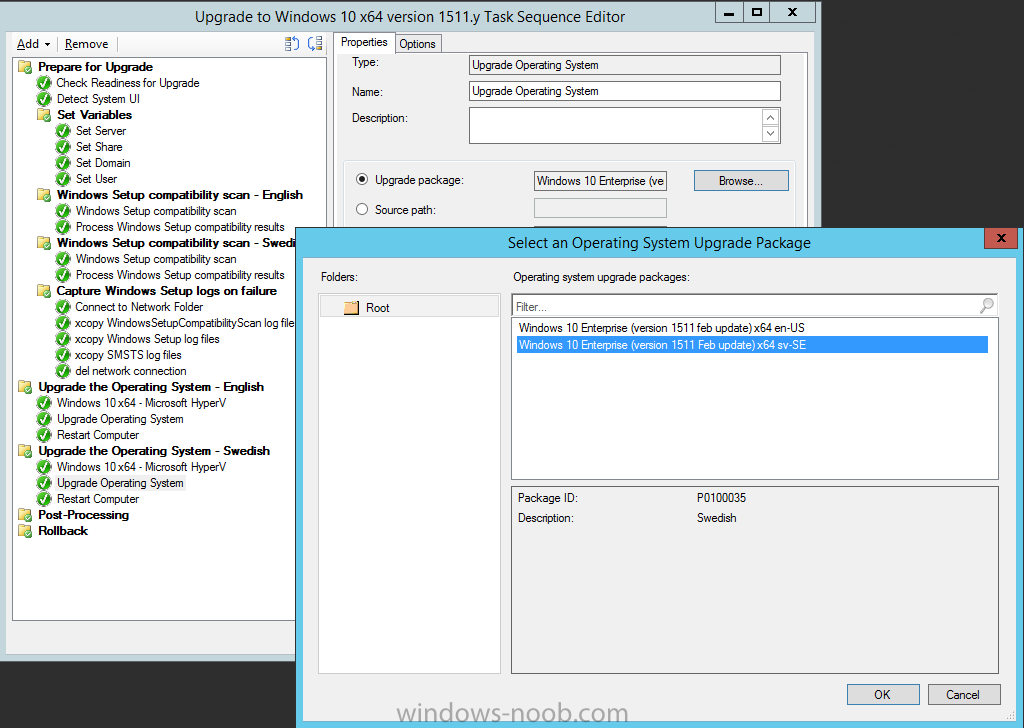
Next, navigate to the Windows Setup compatibility scan group and Change the name of the group from Windows Setup compatibility scan to Windows Setup compatibility scan – English
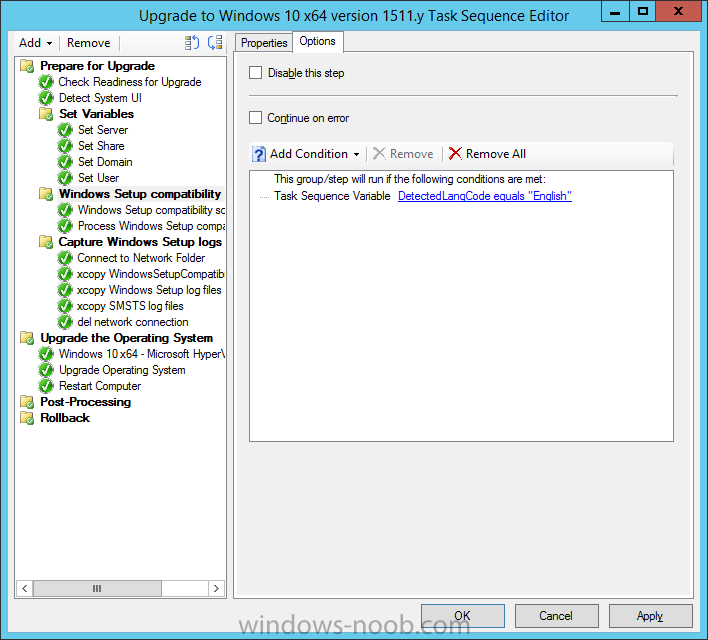
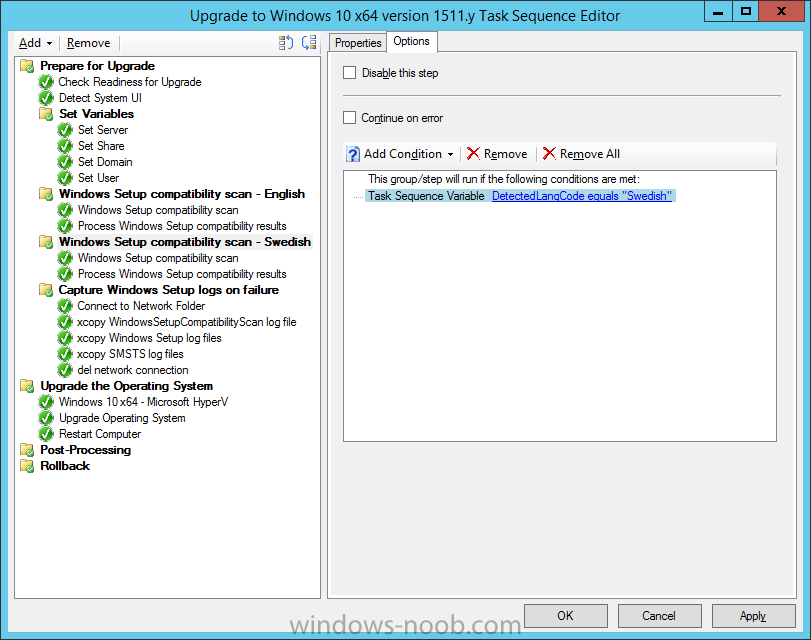
Next, select the options tab. Add a task sequence variable check for DetectedLangCode = English
copy the group (right click copy, right click paste) and rename the copied group to Windows Setup compatibility scan – Swedish (or whatever language you intend to add support for)
Click on the Options tab and change the variable from English to Swedish.
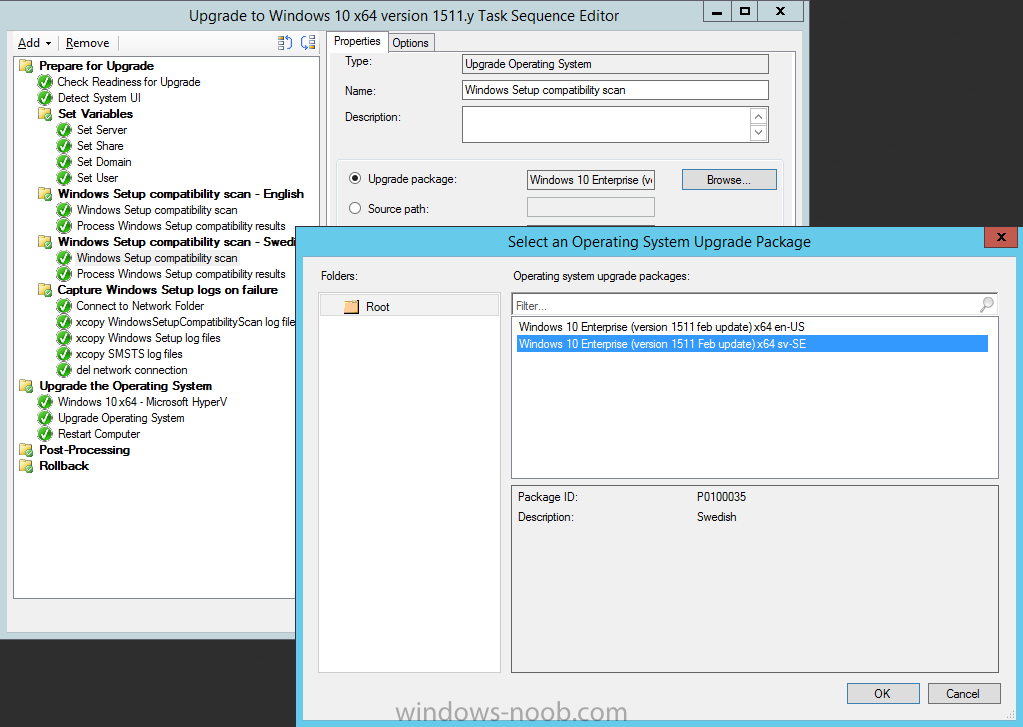
select the Windows Setup compatibility scan step and change the media to point to the matching language that this group will support (eg: Swedish).
Repeat the above for each language you intend to support.
Step 5. Edit the task sequence to set the Upgrade the Operating System languages
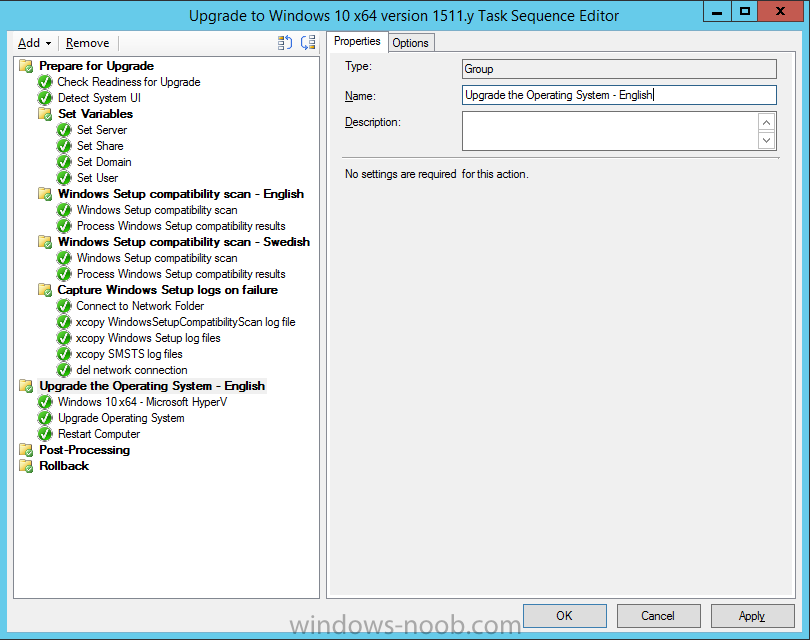
Next, select the Upgrade the Operating System group and rename it to Upgrade the Operating System – English
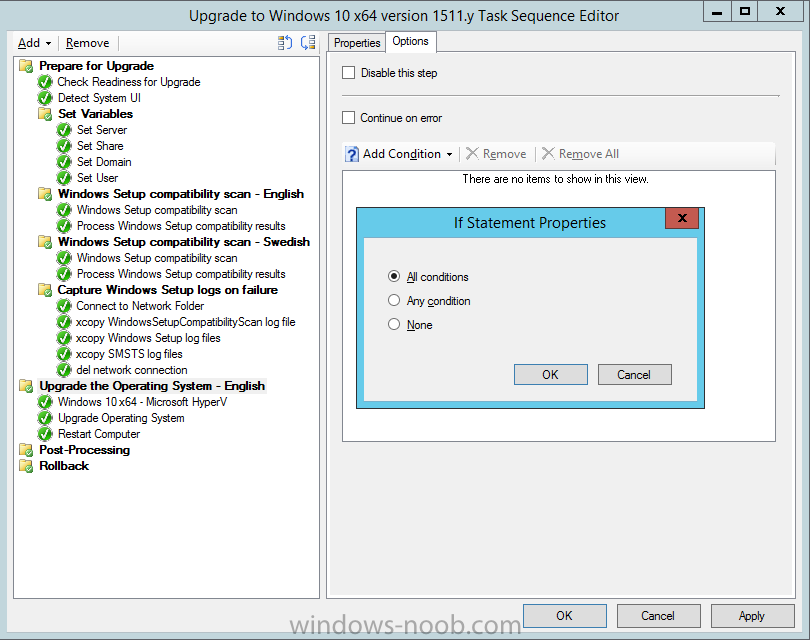
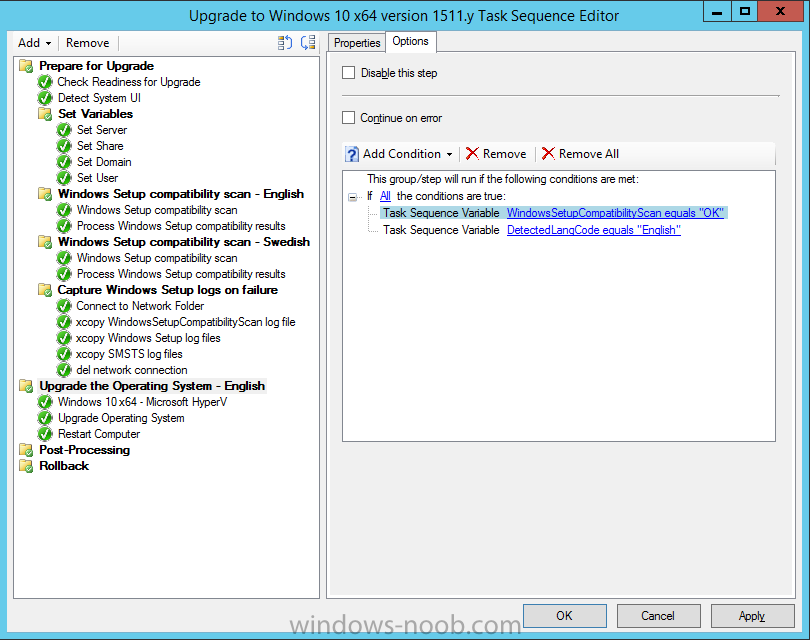
Next, select the options tab. Remove the current variables added and then click on Add Condition, If statement, then All Conditions.
next click on Add Condition, and add a set task sequence variable WindowsSetupCompatibilityScan = OK
and…again click on Add Condition, and add a set task sequence variable DetectedLangCode = English
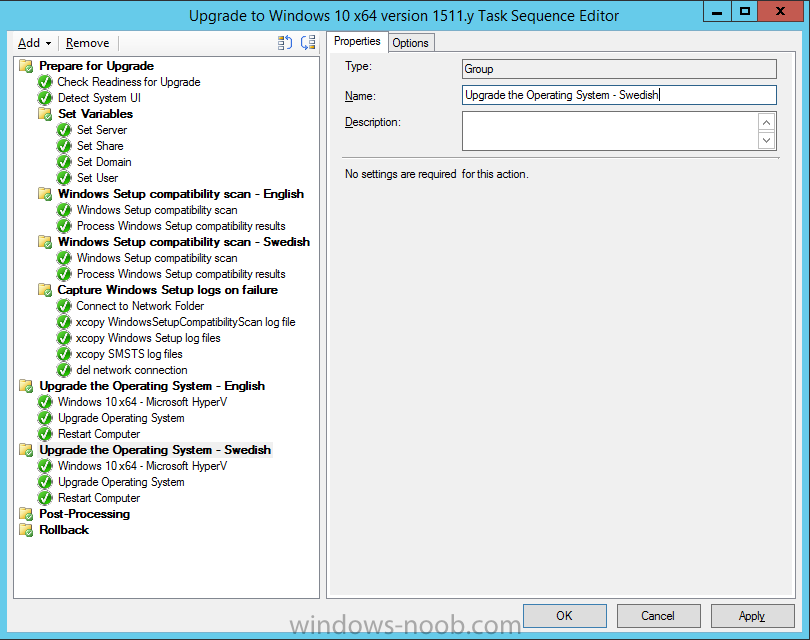
copy the group (right click copy, right click paste) and rename the copied group to Upgrade the Operating System – Swedish (or whatever language you intend to add support for)
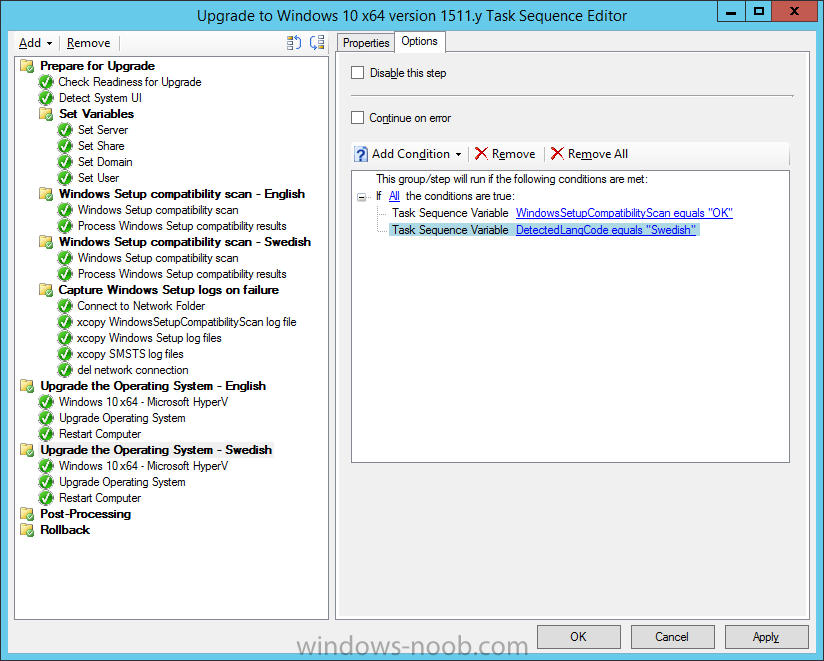
Click on the Options tab and change the DetectedLangCode variable from English to the language you intend to support.
Next select the Upgrade Operating System step and click on browse to change the media from English to the language you intend to support
continue doing the above for each language you intend to support, apply the changes and close the task sequence editor.
Step 6. Review the results
On a computer that is running a language that was added as a language pack and which changed the System UI to match that language, run the Upgrade to Windows 10 task sequence.
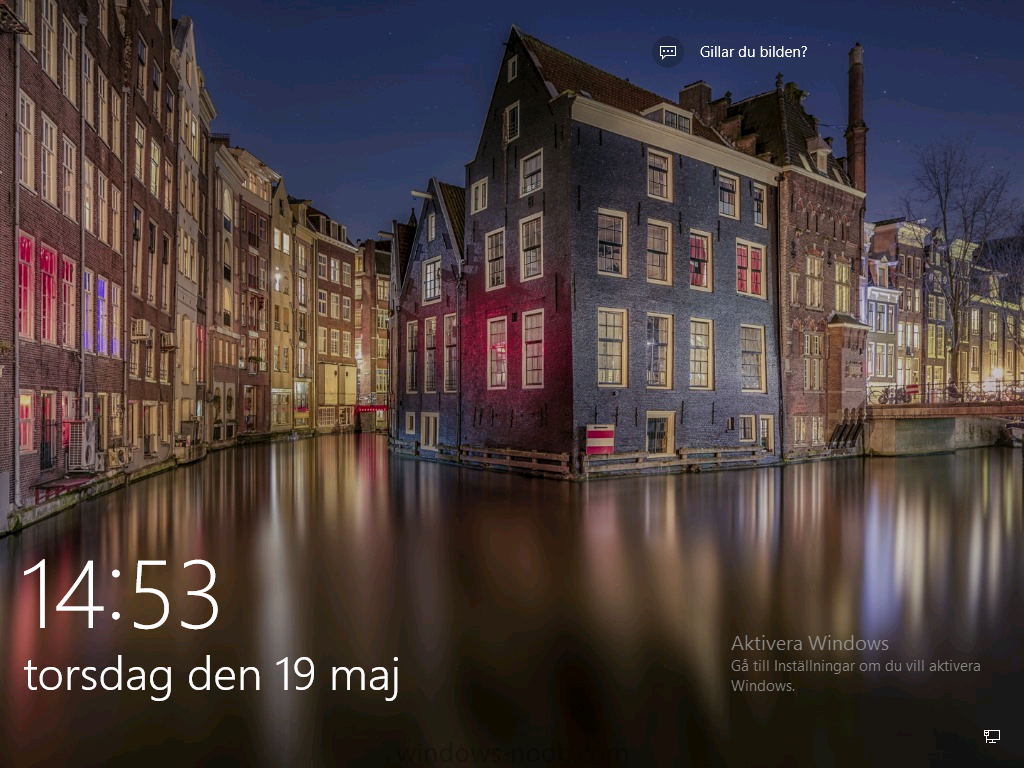
In this example we are attempting to upgrade a Swedish Windows 10 operating system to the next version of Windows 10. As you can see the login screen is in Swedish.
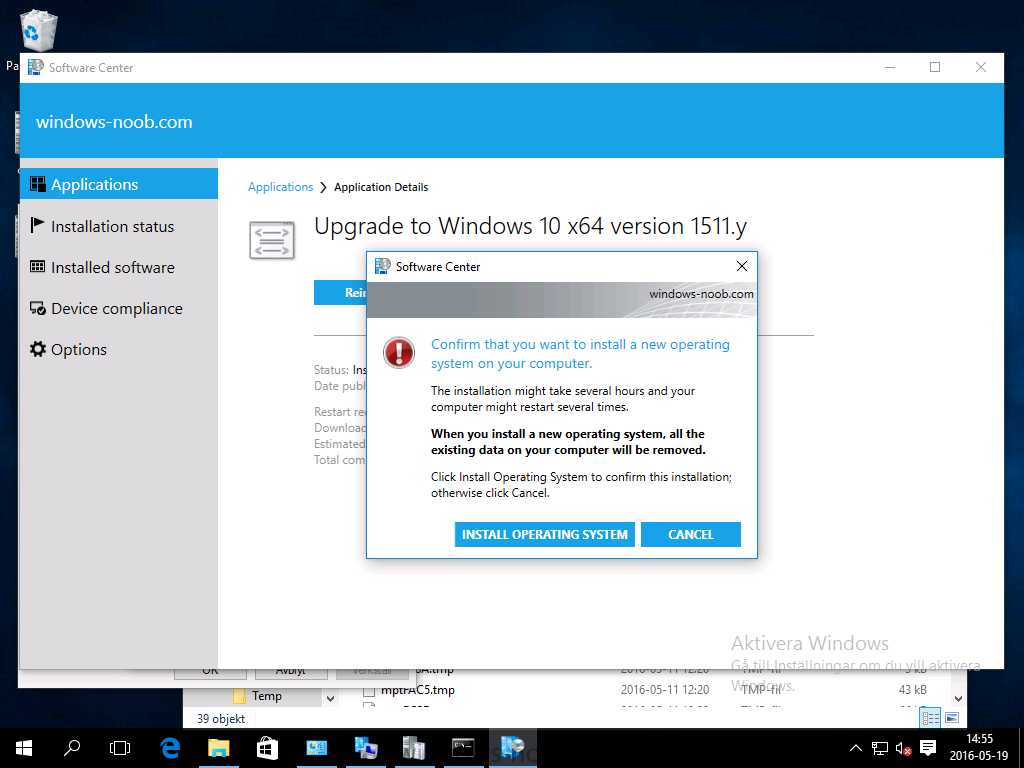
In Software Center, select the task sequence and choose Install (or reinstall if needed), click on Install Operating System when prompted
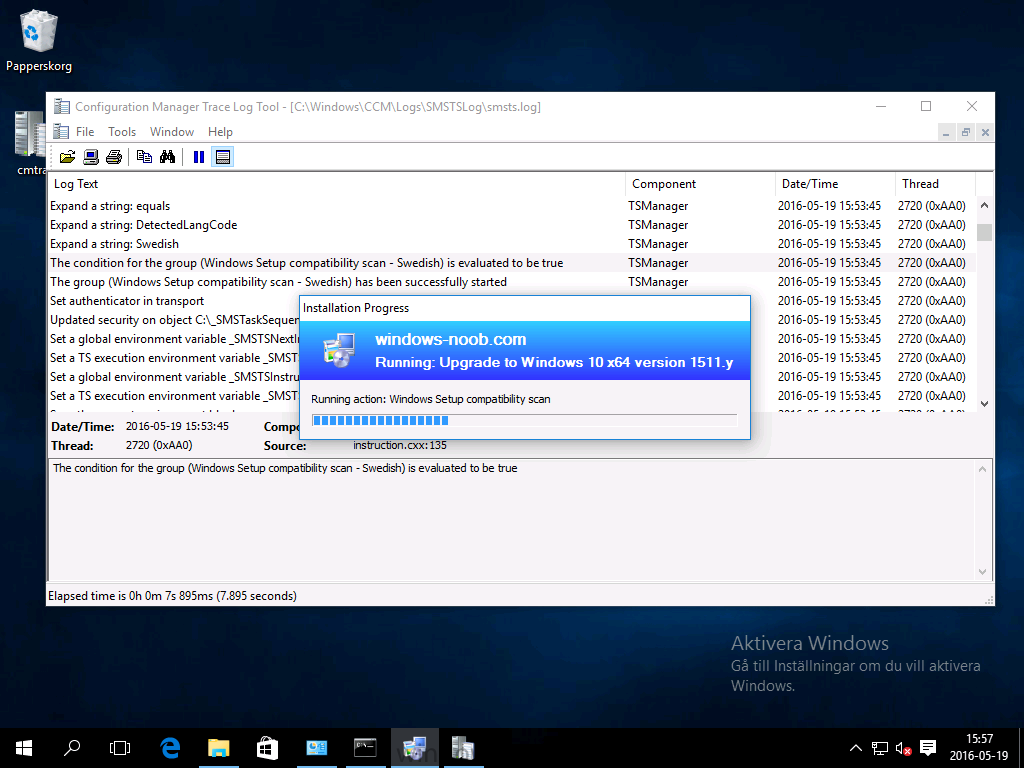
If you want to monitor the event live, then use CMTrace to monitor C:\Windows\CCM\Logs\SMSTSLOG\smsts.log
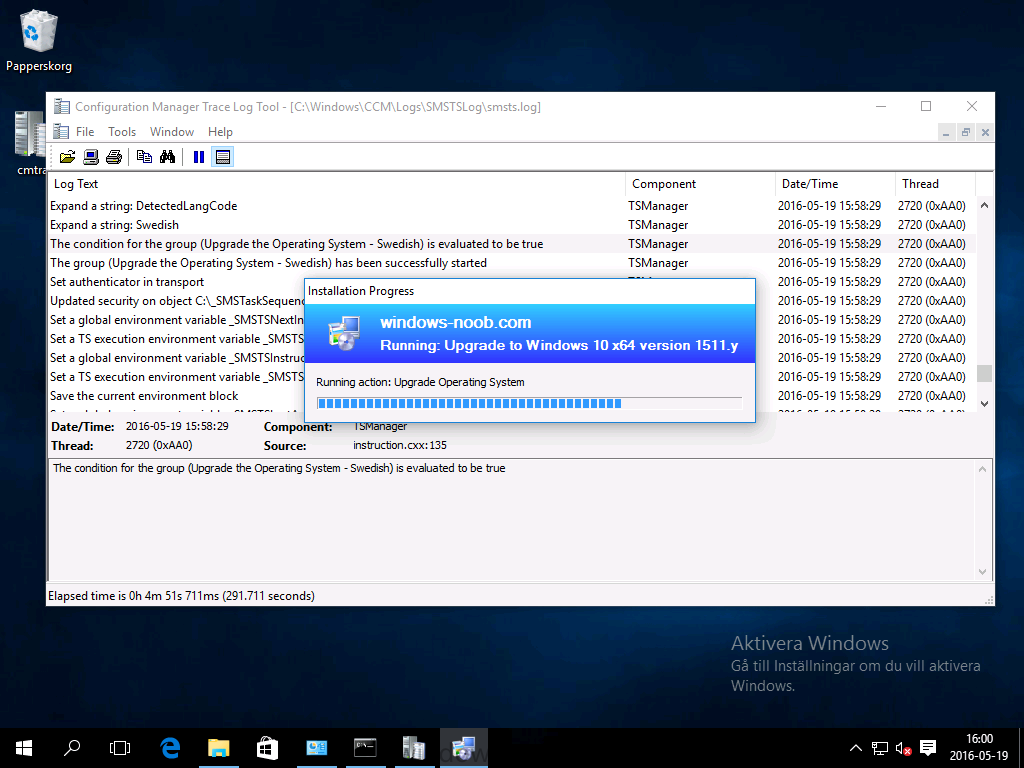
you should see that it correctly identifies the language for the Windows Setup Compatibility scan group
and indeed the Upgrade Operating System – Swedish should kick off without a hitch,
and off it goes…
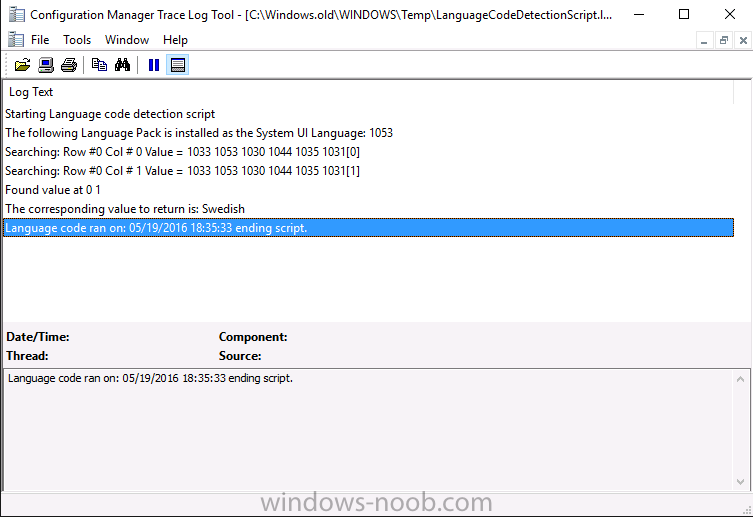
Note: The log file generated by this script is stored in C:\Windows\Temp and contains info about the detected Language Code and the variable that DetectedLangCode will be set to. The name of the log file is LanguageCodeDetectionScript.log
after a successful upgrade, Job done !
Summary
In this guide you’ve applied steps and groups to the Upgrade Task Sequence to detect the System UI language, and apply the correct media where needed, both for the Windows Setup Compatibility scan and for the Upgrade Operating System steps. Dealing with different System UI languages in Windows 10 upgrade scenarios using the Upgrade task sequence isn’t straight forward but at least there’s way’s to solve the problem.
Related Reading
- A deeper look at the Upgrade task sequence in System Center Configuration Manager (Current Branch) – https://www.windows-…current-branch/
- How can I install Windows 10 language packs offline with an MDT Integrated Task Sequence in System Center Configuration Manager (Current Branch) – https://www.windows-…current-branch/
- Appendix F – Country/Region and Language Codes – https://technet.micr…y/dd346950.aspx
- Windows 10 MUI challenge – https://rzander.azur…guage-in-win10/
Downloads
You can download a Microsoft Word copy of this guide here dated 2016/05/19
 How can I detect the system ui in an upgrade task sequence.zip 2.17MB
You can download the PowerShell script used above here.





Hi there,
I need the powershell script you use but can’t download it. Can you help me please?
Regards,
Majid.
you need to sign up/in on http://www.windows-noob.com that is where the script is hosted, once you are logged in as a member you can download it
cheers
niall
Hi Niall,
Thanks for your fast reply.
I am a SCCM noob and one of your fans for years. Now I have the chance to thank you for your hard work. Much appriciated!
Regards,
Majid.