Introduction
One of the many changes in System Center 2012 Configuration Manager Service Pack 1 is related to the way the System Center Endpoint Protection (SCEP) client processes anti malware policy. A new functionality called Client Side Merge is included with SP1.
Multiple antimalware policies that are deployed to the same client computer are merged on the client. When two settings are in conflict, the highest priority option is used. Some settings are also merged, such as exclusion lists from separate antimalware policies. Client-side merge also honors the priority that you configured for each antimalware policy.
Source: Technet.
This means that if more than one antimalware policy is targeted to collections that the computer is a member of, then those policies will be merged together and the highest priority options within those policies are used.
This change is good because it allows clients to merge settings from multiple antimalware policies however the side-effect of this change means troubleshooting which AntiMalware policy is applied to the client is harder to determine.
Understanding the change
To demonstrate the change, and what it can mean for you when troubleshooting, we need to have a quick history lesson.
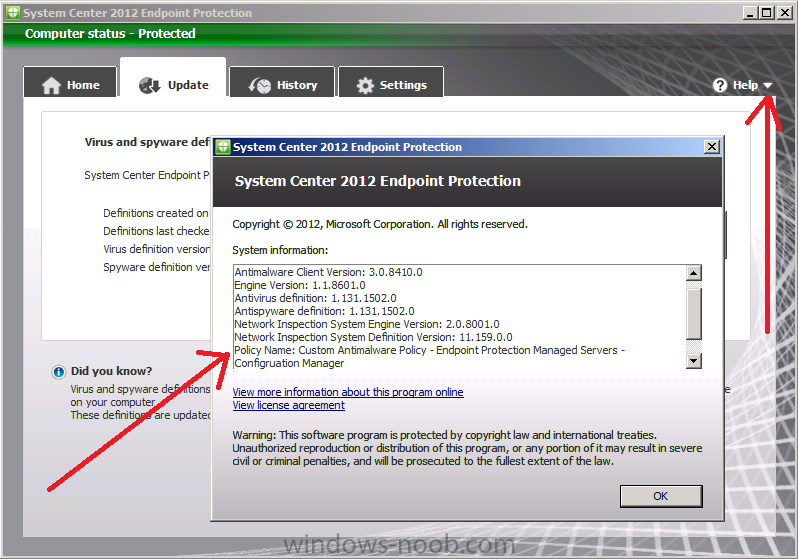
In System Center 2012 Configuration Manager RTM if you deployed SCEP to a computer and wanted to quickly verify what policy had been applied to that computer you could open the SCEP client UI on the client computer, click on the downward pointing arrow beside help and select the option About System Center Endpoint Protection.
That in turn would bring up a window showing lots of useful information including the name of the applied antimalware policy (if any) as per the screenshot below:
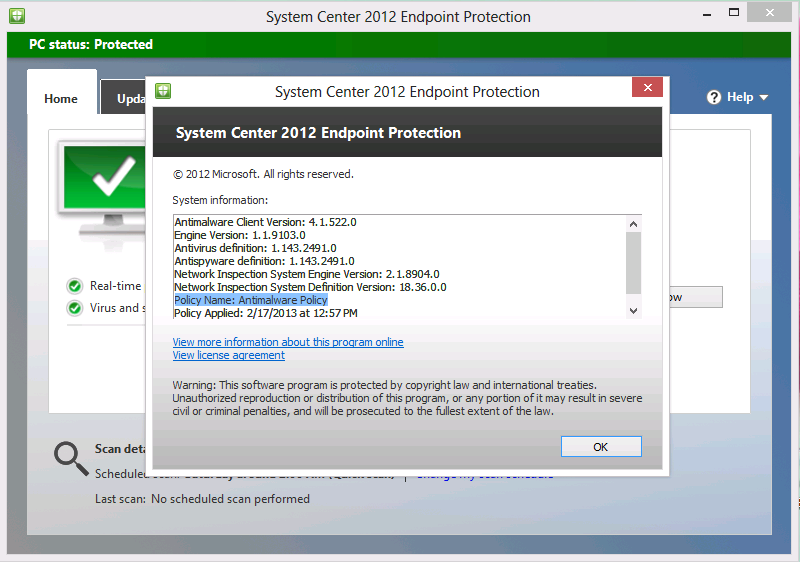
Ok, that is how things looked in the RTM release of the SCEP client, what about SCEP UI on a System Center 2012 Configuration Manager Service Pack 1 client.
As you can see from the above screenshot the Policy Name (highlighted in blue) is listed with a generic name as Policy Name: Antimalware Policy.
This doesn’t give us the same information as we had before so it is hard to tell (from the UI) what antimalware policy(s) are applied.
Troubleshooting Antimalware Policy application
Now that we are aware of the change, we want to be able to determine which policies are applied, we can do this both on the Client and on a system hosting a Configuration Manager console.
Method 1: Check the registry
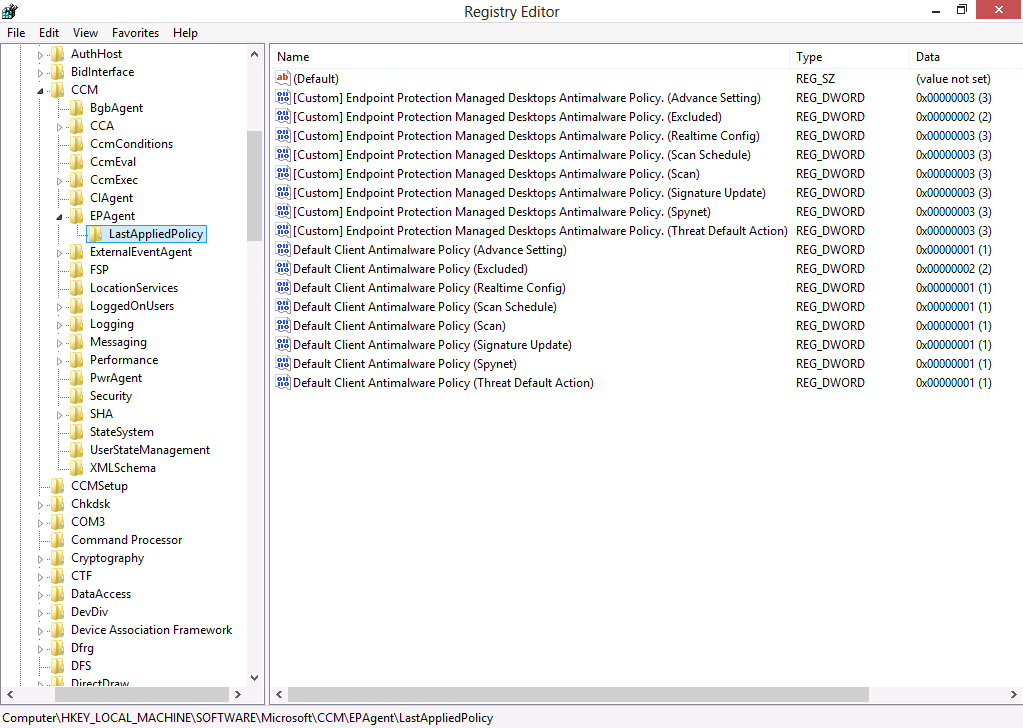
This method involves checking a registry key on the client itself. Open an administrative command prompt and type regedit, when the registry editor appears browse to HKEY_LOCAL_MACHINE\SOFTWARE\Microsoft\CCM\EPAgent\LastAppliedPolicy. It will reveal information similar to the below:
What the above reveals is that the following two Antimalware Policies are merged (via client side merge) to our client computer
- Default client antimalware policy
- [Custom] Endpoint Protection Managed Desktops Antimalware Policy
Method 2. Using Reg query to list the merged policies.
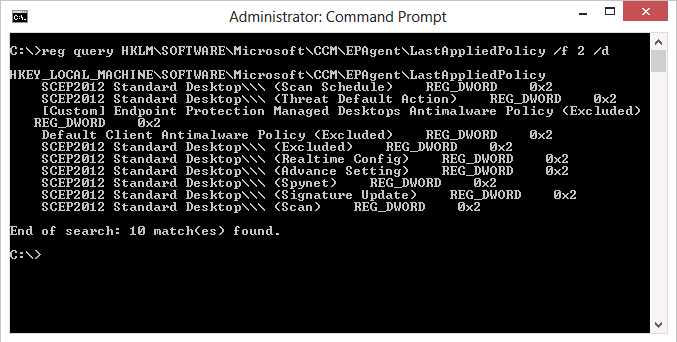
This method also involves checking a registry key on the client itself. In an administrative command prompt issue the following command:
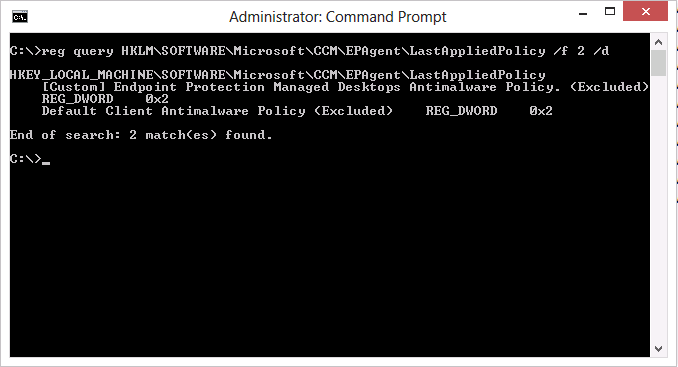
reg query HKLM\SOFTWARE\Microsoft\CCM\EPAgent\LastAppliedPolicy /f 2 /d
and output similar to the following will be revealed as per the screenshot below:
so what does this mean and why is (Excluded) in brackets ? the reason is those sections of the merged policies have been merged together on the client using Client Side Merge.
There are 8 total sections within Antimalware policies and if they are merged the value set in the registry will be 0x00000002 (2). Also note that only sections that are used are listed in the registry, so if you create an AntiMalware Policy with one or more settings in one of the below sections, that only that ‘section’ of Policy is applicable.
- Advance Setting
- Excluded
- Realtime Config
- Scan Schedule
- Scan
- Signature Update
- Spynet
- Threat Default Action
Here’s another example of a client that has three policies targeted to it, and in addition I’ve given the SCEP2012 Standard Desktop policy the highest priority of all three policies.
- Default client antimalware policy
- [Custom] Endpoint Protection Managed Desktops Antimalware Policy
- SCEP2012 Standard Desktop
Method 3. Review the AntiMalware Policies tab on the computer object in the Configuration Manager console.
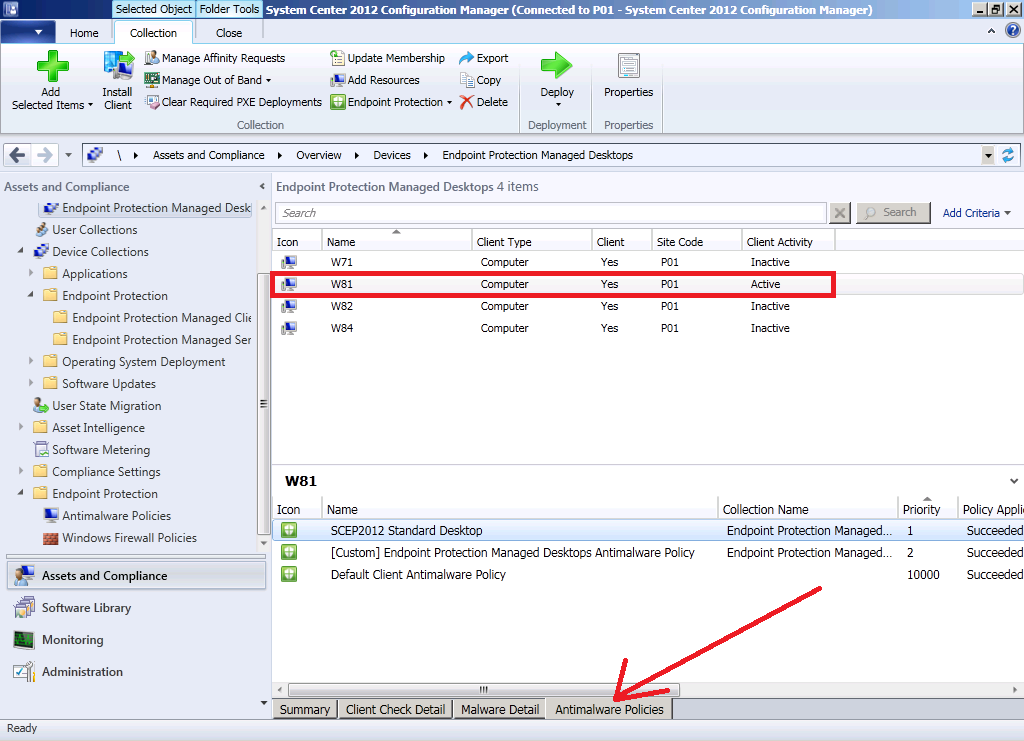
The third method you can use to determine which policies are applied is done on a computer which has the Configuration Manager console installed, in other words you can do this on a computer that isn’t the client which you want to troubleshoot. In the Assets and Compliance workspace, select Devices and locate the ComputerName that you want to examine and select it, then click on the AntiMalware Policies tab as shown below.
You will see a list of AntiMalware Policies (and their associated priority) listed. It will also show if the application of the policy succeeded or not and what collection name is targeted by the policy.
Method 4.
Update: please see Kaido’s post here to see how to do it using PowerShell.
Summary
Client side merge is indeed a good security improvement (and one of the most requested changes by SCEP customers) however now that we have this ability we have to take that into consideration when troubleshooting the application of AntiMalware Policy both on clients and within the Configuration Manager console itlself.
until next time, cheers
niall.



Pingback: How can I deploy System Center 2012 Endpoint Protection Definition Updates from a UNC file shares | just another windows noob
Pingback: Troubleshooting SCEP Anti-Malware Policies on Clients. | System Center Guru